Brief Introduction #
Partner #
Partner role has has the greatest privileges, options and access. Partner can have a several organizations under his control, which he has access to and takes care of – which is the main difference between partner and manager role. Partner can do everything as manager, also for different organizations and more – e.g. add organization or add billing rules to specific billing credentials.
Use this guide chronologically or visit specific page clicking the links below.
Below User tab you switch between Dashboard and Projects by clicking each.
Under Manager you find Flavor Info, Images, Audit Log, Users, Project Quotas, Servers, Taikun Requests, Showback rules, Showback summary, Ticketing and Standalone VMs.
Billing is consisted of Chargeback and Usage Reports.
The next section, Credentials, there are Cloud Credentials, Backup Credentials, Billing Credentials and Showback Credentials.
In Profiles you can visit Kubernetes Profiles, Access Profile, Alerting Profiles, Policy Profiles and Standalone Profiles.
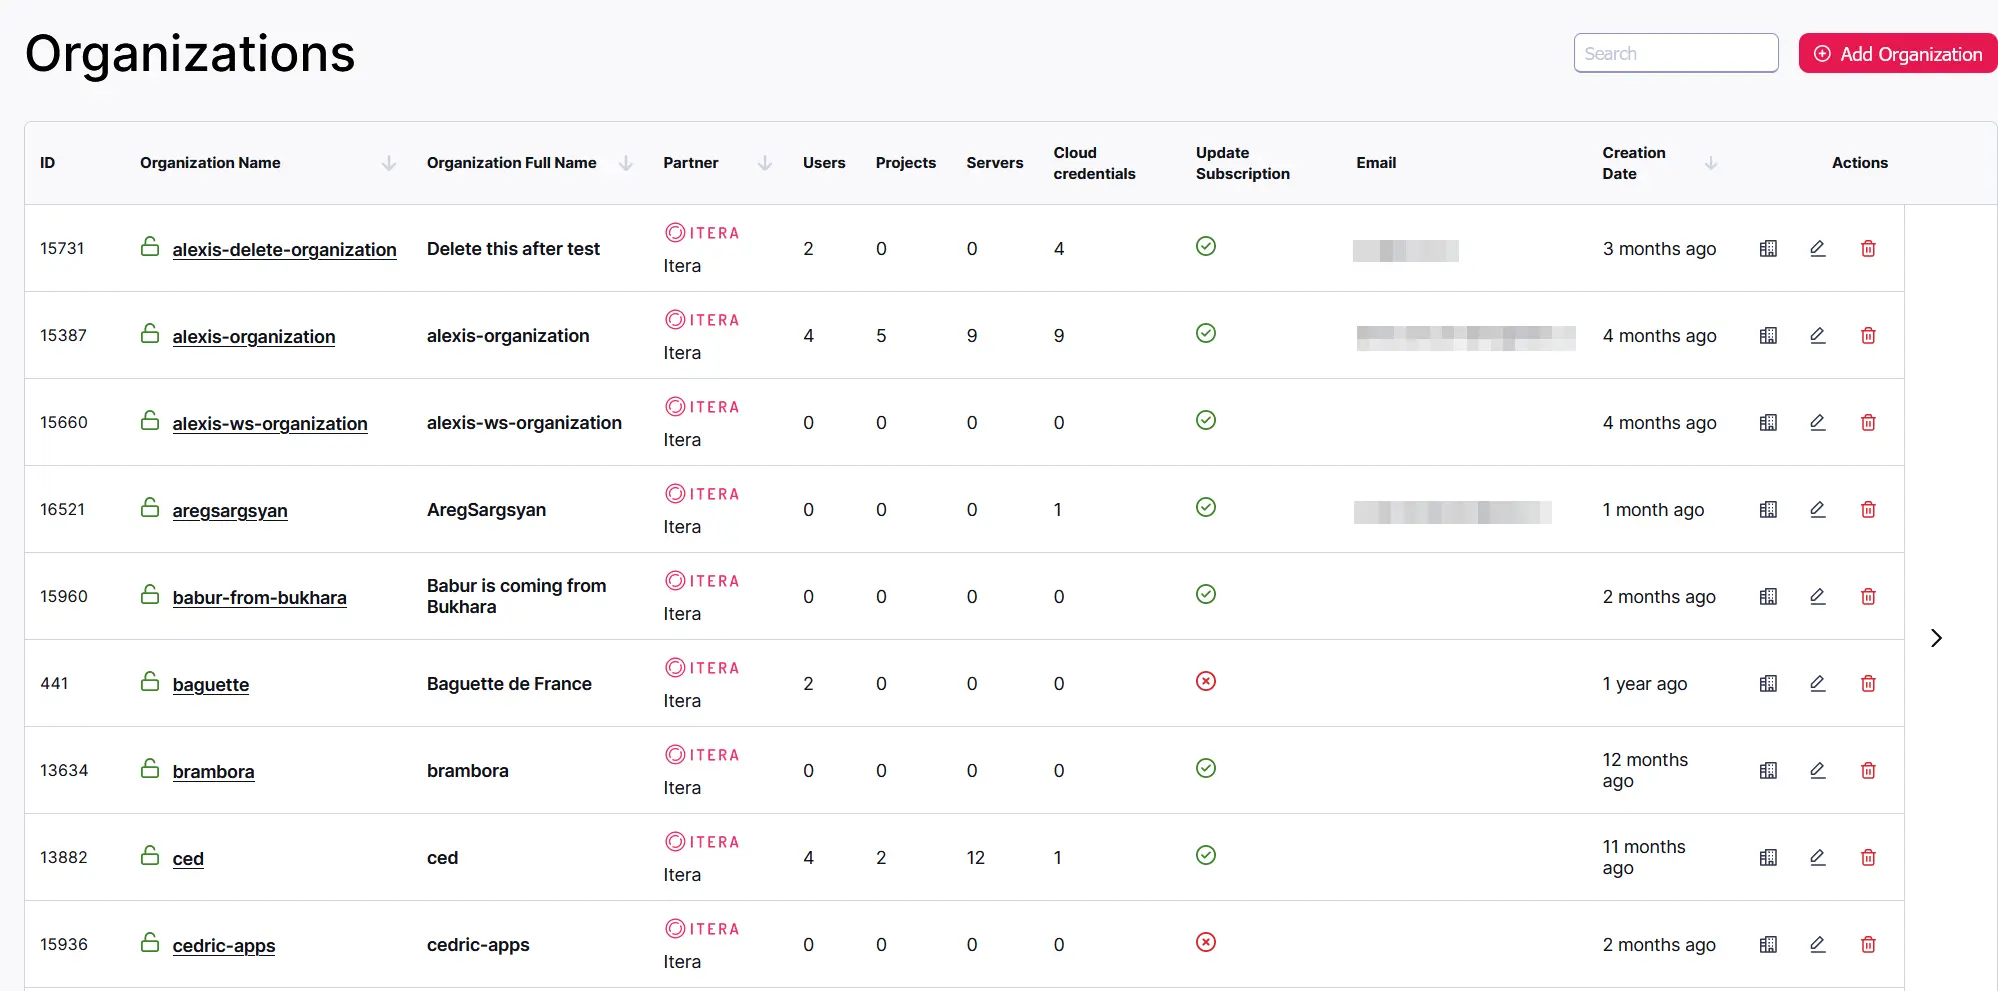
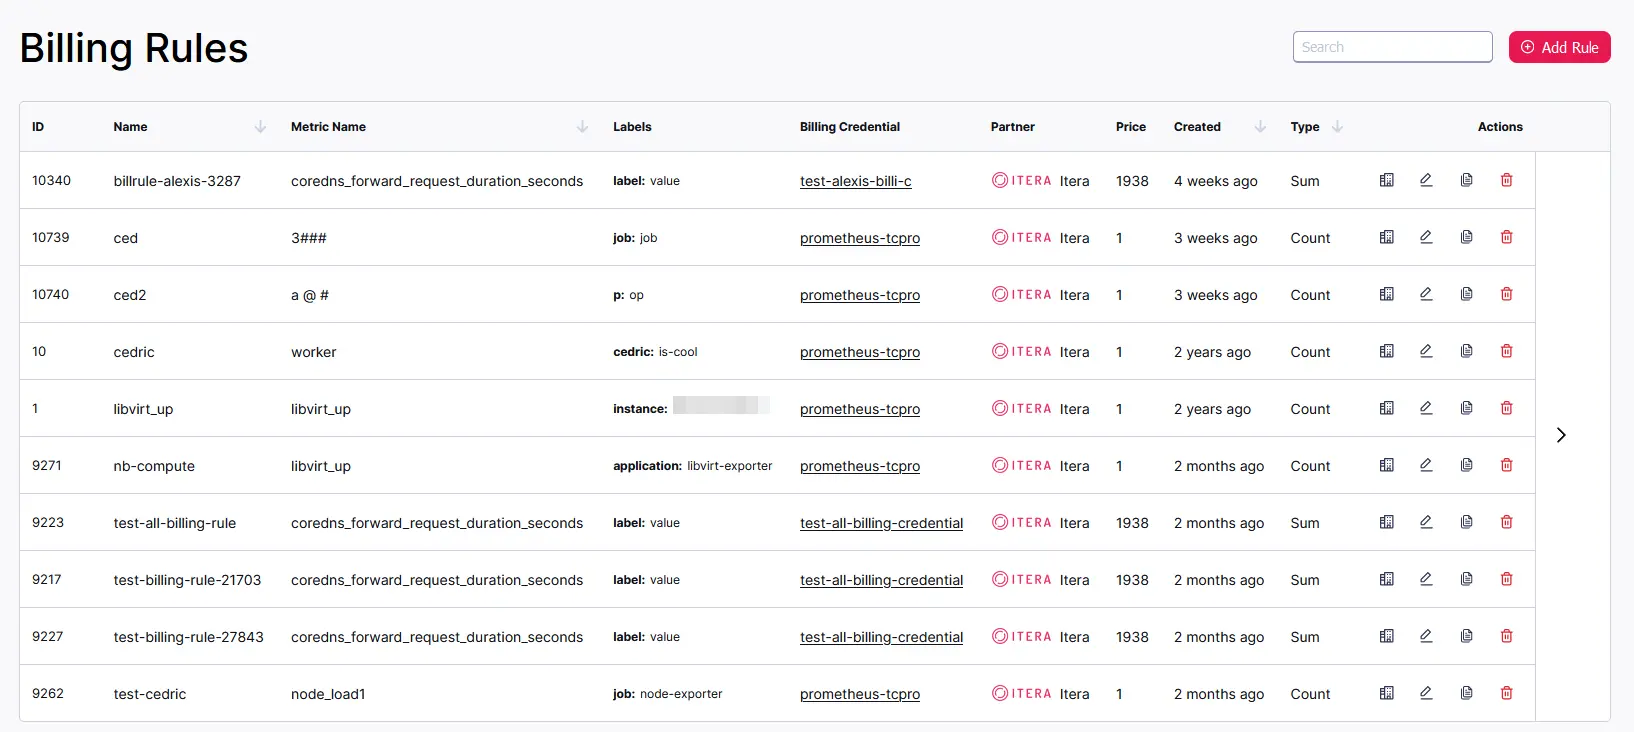
Partner has two sections: Organizations and Billing Rules.
In the last section Configurations, see Slack.
Login to Taikun #
First-time login #
After you receive the token in your mail, it will redirected you to the new page to create a new password.
Warning
The password should meets its conditions: 1 uppercase, 1 lowercase, 1 number, 1 non-alphanumeric and at least 6 signs long (e.g. Test@123)!

If you did not manage to use the token in time (3 hours), click Resend Token button and use the new token in your e-mail.

Login #
Enter your E-mail and the created Password then click LOGIN button. The LOGIN button is disabled until you fill in both fields.

You are immediately redirected to the Dashboard.
Wrong Credentials #
If you enter the wrong password, you receive the error message Bad credentials.

Forgotten password #
If you don’t remember your password, use Forget your password? button.

A token is sent to your e-mail, clicking the link you will be redirected to the page where you can reset your password.

Dashboard #
You can access the Dashboard by clicking upper left Taikun logo or the Dashboard in the tabs (under User):

On Dashboard you can find summary of following:
- Select Organization
- Users
- Charts (Projects, Server Statuses, Servers, Cloud Credential, Nodes Overview, Pod overview, Project with Alerts and Kubernetes Health)
- Tables (Kubernetes, Project Resource Allocation and Recent Events)
Header #
On every page in the upper right corner you can see:


- logo of your organization

- link to this documentation, variable for every page

- global search – search for projects or servers, case insensitive, can be open with double shift at every page
- Taikun search – search through projects, users, servers, credentials, profiles or organizations
- Kubernetes Search – have to be checked (as searching kubernetes takes longer time) and search through all active kubernetes

- Real-time notifications
- General – notifications about changes made in projects (e.g. created project, enable monitoring, change of status), for details see Dashboard – Recent Events

- Alerts – new/persisting (red) or resolved (green) alerts, see Projects – Alerts


- your information and setting, see My Profile
- if your display name is changed, the name can be seen in the corner
Select Organization #
Choose Organization with drop-down button and the Dashboard will be updated (can take up to tens of seconds).

Users #
Shows how many Users are involved in selected organization. Number of users changes automatically with selecting different organizations.

For more information, see Users.
To find the information about your profile visit My Profile.
Charts #
Projects #
The graph shows number of Projects (right corner) for your organization and the pie chart shows their current status (pointing arrow at some part of the graph):
- Failed
- Succeeded
- Pending
- Updating

By clicking the specific part in graph, you see an overview of selected projects.
For more information visit Projects.
Server Statuses #
In the right corner is number of Servers and the pie chart shows their current status (pointing arrow at some part of the graph):
- Failed
- Succeeded
- Pending
- Updating

By clicking the specific part in graph you see an overview of selected servers.
For more information visit Servers.
Servers #
In the right corner is shown number of all Servers for your organization. The graph shows where the servers are hosted (AWS, Azure, OpenStack). When you point at a column, exact number of servers used is shown.

For more information about servers visit Servers, for clouds visit Cloud Credentials.
Cloud Credentials #
In the right corner is shown number of Cloud Credentials. The graph shows which cloud (AWS, Azure, OpenStack) and how many of each type are used. When you point to a column, the exact number of cloud credentials used is shown. In the right corner is number of all cloud credentials.

For more information visit Cloud Credentials.
Nodes overview #
In the right corner is shown number of Nodes and the pie chart shows their current status (pointing arrow at some part of the graph):
- Healthy
- Unhealthy

By clicking the graph you see Kubernetes overview, where you can find Projects with number of Healthy and Unhealthy Nodes.
Pods overview #
In the right corner is shown number of Pods and the pie chart shows their current status (pointing arrow at some part of the graph):
- Healthy
- Unhealthy

By clicking the graph you see Kubernetes overview, where you can find Projects with number of Healthy and Unhealthy Pods.
Projects with Alerts #
In the right corner is shown number of all alerts and the pie chart shows how many alerts has each project (pointing arrow at some part of the graph):

By clicking the graph you see Kubernetes overview, where you can find Projects with number of alerts.
For more information see Projects – Alerts.
Kubernetes Health #
In the right corner is shown number of Non-Healthy items and the pie chart shows status for all projects with active kubernetes (pointing arrow at some part of the graph):
- Healthy
- Unhealthy
- Warning
- Unknown

By clicking the graph you see Kubernetes overview, where you can find Projects (with kubernetes) with its kubernetes health status.
For more information see Projects- Health.
Open Project #
By clicking the specific part in graph, you see an overview of selected projects. Use to access the project. Works for every graph except Servers and Cloud Credentials.
Tables #
Kubernetes #
The Kubernetes chart consists of 3 main sections:
- Project
- Nodes
- Pods

Projects
In the right corner you can switch between Projects with Kubernetes.
Nodes
Lists Nodes by Name and shows status of Disk, Memory, PIDs and Ready (Status of the Node).
Status: working
Status: not wokring
Pods
For every Pod (characterized by Pod Name) is listed its Namespace, Node, Restart Count, Age and Status.
If the status is failed, you can check the pod in Kubernetes section – use the link in Nodes – Metadata Name or Pods – Pod Name.

For more information see Projects – Kubernetes.
Project Resource Allocation #
In this section you can see how the usage of CPUs, RAM and Disk Size are divided between the individual projects. The last column Total shows the sum of all projects for CPU, RAM or Disk Size. You can also sort CPU, RAM and Disk Size by Usage or Limit (if there is any).

The pie charts shows percentage of usage of each project:
Green – small usage
Yellow – normal usage
Orange – higher usage
Red – full usage
Limits can be changed in Project Quotas.
Recent Events #
Lists 10 events from the latest. Green ones are successful events, red ones are failed. The update button is in the right corner.

Notifications #
Warning
If there is a real-time change, you are notified through Notifications
Whenever user makes a change (create project, add backup, delete project etc.) you are notified via bellat the top of a page.
The colors indicate:
- green – successful action
- red – failed action

The notification contains a brief message on a specific project and bellow the message is time of the change. After clicking Show Project you will access the project in which the change was made.
As the name suggests: Mark as Read and Dismiss all.
See all notification
After clicking See all notification you are redirected to Audit Log.
Projects #
On the Projects tab, you can preview all existing projects for your organization.

Select organization – choose organization to see all projects for your selection
Each project is described by the following information:
Id, Project Name, Organization Name #
Changeless descriptions for each Project.
Status #
Status shows the current status and actions of your servers in the project in real-time. Below are all possible statuses listed with their description.
- Ready
- all servers in the project are ready without any issues
- Deleting
- one or more servers in your current project are being deleted
- Failure
- one or more servers failed during the action for any reason (for instance during boot or creation)
- Pending
- one or more servers are in a pending state, which means that, for instance, they have not yet been created on the hosted platform
- Updating
- one or more servers in the project are being updated by Taikun during the creation process
- Upgrading
- one or more servers upgrade Kubernetes, cloud credentials or others
Health #
This column describes a condition of the project cluster. Keep in mind that a good-working project should be always Healthy.
- Healthy
- cluster id without any further problems
- None
- cluster is probably empty, there is nothing to check
- Unhealthy
- problems with connection to Kubernetes or Monitoring API
- Unknown
- cannot connect Kubernetes API
- Warning
- minor issues
Creation Date #
The exact time stamp when the project was created.
Kubernetes Version #
Shows current Kubernetes version for each project.
Cloud Type #
Shows which provider is hosting your project cluster:
- AWS
- Azure
- OpenStack
K8’s #
Kubernates active
Kubernetes not active
Expiration Date #
This feature helps you to manage your project – its durability. By default, the expiration date to your project is set to infinity. You can set it during project creation or modify it after the project is created with Extend Project Lifetime.
Warning
After the expiration date, your project is NOT affected, deleted or lock. It will stays the same.
Assigned Users #
Edit which users should have access to the project, confirm with update button
Info
You can also assign the user to a project in Users .
Actions #
Lock Project – disable all buttons which can cause some changes in project (see Projects – Project Details)
Unlock Project – enable action buttons
Delete – to delete project, the project must be empty with status Ready
Show hidden columns #
Click small arrow on the right side of the table to see more details.

Expand the table to see:
- Alerts count – number of firing alerts in a project
- Created By
- Last Modified
- Last Modified By
Sorting #
Projects can be sorted by Project Name, Organization Name, Status, Creation Date, Kubernetes version or Cloud Type. Also the search bar can be used to find some specific project.
Project Details-K8s #
By clicking the selected project you are redirected to the Servers. Here you can see all servers for the project with their description.

Project Info #
Under Servers title is a brief description of a project – such as Project Name, Project Status, Cloud Type, Kubernetes Version, Access Profile, Cloud Credentials, Kubernetes Profile, Alerting Profile, Access IP Address (if you use this address to ssh connect, please do not use user ubuntu, it’s in use by Taikun for managing the cluster) and Kubernetes Health. Some of these include links to e.g. cloud or profiles.

You can also see here ETC=Estimated Time to Complete. It is approx time (in minutes) until the cluster will be completed.

Servers #
Every server is described by ID, Server Name, IP Address, Flavor, CPU/RAM/Disk Size, Role, Status, Kuebernetes Health, Creation Time and Actions. If you expand the table, you can see the last modification made (Last Modified, Last Modified By).

Server status can be:
- Deleting
- Failure
- Pending
- Pending Delete
- Pending Upgrade
- Ready
- Updating
- Upgrading
Actions
Show Status – shows current status from the cloud for 3 seconds
Reboot – choose HARD or SOFT reboot for each server
- HARD – the power to the system is physically turned off and back again causing an initial boot
- SOFT – system restarts without the need to interrupt the power
Info
Hard or soft reboot can be chosen only for Openstack. For AWS and Azure there is only simple reboot available.
Actions Buttons #
Upgrade #
Upgrade your version of Kubespray to the latest one. The button is disabled, if your Kubernetes are up to date. Enabling auto upgrade during the project creation, the Upgrade button won’t be available.
Enable/Disable Backup #
You can Enable Backup if you have added the credentials in Backup Credentials and the project isn’t locked. You can do it during the project creation or after the project is created, more info here.
After you enable the backup, you get notified through Notification and you can check the successful status in Kubernetes. In Projects – Kubernetes – Deployment section you should see velero installed

After enabling backup, you should add Backup Policies.
Enable/Disable Monitoring #
Be able to see detailed processes with enabling monitoring. After you enable it, which takes up to 5 minutes, you can preview all tracks with Logs button. The tracking starts the moment Logs button is enabled.
You can enable monitoring before project creation or (if you forgot or have changed your mind) whenever your project is created.
Disable function works the same.
Commit #
Sends the changes to repository.
Once the cluster is committed you will see ETC in project info.
Repair #
When the server’s are Failed or there is some other problem in the cluster, it can be repaired by changing the status to Ready. If all the servers have failed during the first creation, the repair button works as commit and you should use it. If only one server is failed, you should change only the one server’s status, because repair will restart the status of all servers.

Attach/Detach Alerting Profile #
Attach Alerting Profile if you want to receive a notifications about alerts in your project. Detach if notifications are no longer needed.
Lock/Unlock #
Lock/
Unlock
Project is unlocked
Clicking the button you lock a project. You can preview some pages (e.g. Kube Info), but you can’t make any changes in the project (see Project Details – Project info).
Project is locked
Clicking the button you unlock a project and enable action buttons.
Add Server #
To create a new server click button and fill all the fields.
You will receive an error message if no flavor has been bound to your project yet. You can also bind the flavor during project creation.

Use the link to bind a flavor.

Server Name – only alphanumeric characters and dash are allowed, 1-30 characters.
Warning
Letters must be lowercase!
Disk size – should be at least 30GB
Role – you are able to choose from several roles for your servers, which are set according to Kubernetes settings
Flavor – choose from the list of offered flavors (e.g. n0.xlarge)
- you can bind the flavors from clouds to the project in Flavor Info
Info
Recommendation for sizing:
- bastion recommended 2 vCPU + 2GB of RAM
- masters recommended 4 vCPU + 8GB of RAM
Number of Servers – set number for kubeworker or kubemaster, add odd number of masters (min. 3 for a highly available cluster)
Warning
The change MUST be committed.
Kubernetes Node Labels – label nodes where you want to sent or restrict pods; you can add more labels with add label button, for more info see Kubernetes docs
For more information see Creating a Cluster.
Function buttons
Between Project Info and Servers are buttons with specific features or more detailed information.
Delete #
Delete the selected server’s. You can delete servers to still have a working cluster (1 bastion, 1 master and 1 worker) or delete the whole working cluster.
Warning
The change DOES NOT have to be committed.
History #
This button will redirect you to Audit Log with pre-filled organization and project, so you can preview the changes made for the chosen project.

Kubeconfigs #
Add a new kubernetes configuration for your profile and project.

Kubeconfig Name – choose a name for your kubeconfig
Kubeconfig Role
- cluster-admin – perform any action on any resource, ClusterRoleBinding – gives full control over every resource in the cluster and in all namespaces (or in very resource in the role binding’s namespace – RoleBinding)
- admin – RoleBinding – allows read/write access to most resources in a namespace, does not allow write access to resource quota or to the namespace itself
- edit – allows read/write access to most objects in a namespace, does not allow viewing or modifying roles or role bindings, allows accessing Secrets and running Pods as any ServiceAccount in the namespace
- view – see most objects in a namespace, does not allow viewing roles or role bindings, does not allow viewing Secrets
Info
For more info, see kubernetes documentation.
Application kubeconfig – choose if kubeconfig can be used by other users (all or managers only) or Personal kubeconfig – kubeconfig can be used only by you
You can see all project’s configurations in the table with its ID, Name, User Name, User Role, Project, Accessible for all and Actions.

Actions
This .yaml file can be download and use to organize information about clusters, users, namespaces, and authentication mechanisms.
Delete your kube config if it is no longer needed. You can also delete user’s or manager’s kube configs.
Kube Info #
If Kubernetes is active, Kube Info button will take you to the Kubernetes configuration. For more see Projects – Kubernetes.
Events #
You are redirected to Events, where you can see all Kubernetes changes made in the project. To preview details for more information to each action use button. A green strip indicates a successful action, a brown strip indicates a failed action.
You can sort Events by:
- Search field
- Filling Start and End Date
- Tick Only failed to filter failed actions

Logs #
Preview Kubernetes cluster logs to Grafana.
Logs button is disabled if Monitoring is disabled. To view logs, you must first Enable Monitoring.

Write your query and use Start date and End Date for sorting. You can also expand every message – red is an added action, without color is other log.

Alerts #
First thing when you access Alerts are Firing Alerts. This section is refreshed every 5 minutes, but you can also use the refresh button to see the most updated data.

To see all alerts, use upper right Show All Alerts button. As seen above, firing alerts are marked with red color.
You can silence alert and sort all the alerts by firing, silenced, all or resolved.
Alerts are accessible only if Monitoring is enabled and the project is not empty.

For each alert you can see details and use a link that will redirected you to Metrics with the query already filled.
The index number at Alerts shows the number of firing alerts. When the firing alerts are resolved, the number disappears.
Firing alerts also work from the real-time notifications bell in header.

The notification contains a brief message on a specific project and bellow the message is time of the change. After clicking Show Project, you can access the project in which the alert is.
As the name suggests: Mark as Read and Dismiss all.
Metrics #
Write a query, search Prometheus Metrics and preview the value needed.
Modify Step or Date.
Switch between Console and Graph for better results.

Backup Policy #
After you Enable Backup, you have to create a Backup Policy. After clicking the Backup Policy button you get redirected to the new page, where you create a new policy with Add Policy button.

Name – choose a name for your backup (3-30 characters)
Retention period – how long you want to keep the backup (format e.g. 72h)
Cron period – how often you want to do the backup
- predefined – choose from selection from the most common periods
- custom – if you want to specify your own period (format * * * * *)
- e.g. every hour – 0 * * * *; daily – 0 0 * * *, weekly on Sunday – 0 0 * * 0
crontab guru with examples
Add Include/Exclude Namespace – specify the special requests that you want to include or exclude from the backup, at least one must be filled
Important
The backup is done with a snapshot method – backup copy used to create the entire copy of servers every chosen time period.
There are three tabs:
Schedules
In Schedules you can find overview of your backup policy.

Show description – see detailed e.g. specification, metadata etc.
Delete – stop the backup by deleting the policy
Backups
Backups contain backups from schedules.

Show description – see detailed e.g. specification, metadata etc.
Restore backup – if anything goes wrong, you can restore the backup, which you will then see in Restores tab
Delete – delete the backup
Restores
Overview of restores from Backups.

Show description – see detailed e.g. metadata etc.
Delete – delete the restore
Dashboard #
Dashboard is accessible only if cluster is created and monitoring is enabled.

Here you can see graphs with Memory and CPU usage for the project. You can also add Query you want.

Name – choose name for your query (e.g. My Query)
Expression – fill in Metrics data (e.g. node_procs_running)
Description – describe your query (e.g. Node Process Running)
Category Name – choose category for your query (e.g. Nodes)
Project Details – VMs #
By clicking VMs button in Servers page or VMs View in Project page you are redirected to the VMs Servers. Here you can see all virtual machines for the project with their description.

Project Info #
Under Servers title is a brief description of the project – such as Project Name (with locked/unlocked image), Project Status, Cloud Type or Cloud Credentials.

When there is some operation going on, you can also see here ETC=Estimated Time to Complete. It is approx time (in minutes) until the cluster will be completed.

Servers #
Every Server is described by ID, Name, Flavor, IP Address, Public IP Address, Status, Profile, Image and Created. If you expand the table, you can see the last modification made (Created By, Last Modified, Last Modified By).

Server status can be:
- Deleting
- Failure
- Pending
- Pending Delete
- Pending Upgrade
- Ready
- Updating
- Upgrading
Actions #
Commit #
Sends the changes to the repository.
Once the cluster is committed you will see ETC in project info.
Repair #
When the server’s are Failed, use repair button.

Add VM #
To create a new server click button and fill all the fields. You, as user, can’t delete servers – think twice which and how many servers you want to create.
Warning
For creating the VM: Image has to be bound and Stanalone Profile has to be created.

Server Name – only alphanumeric characters and dash are allowed, 1-30 characters.
Warning
Letters must be lowercase!
Flavor – choose from the list of offered flavors (e.g. n0.large)
Image – choose from the list of offered images (e.g. ubuntu-20.04)
Volume Size – minimal size is automatically filled in when you select image, you can only increase the volume size number
Volume Type – optional, choose from drop down selection
Profile – choose Standalone profile
Count – how many VMs you want to create
Public IP – check if you want to enable public IP
Cloud-init – optional, if set it will override the ssh key from standalone profile
Tags – enter Key and Value
Disk – enter Name, choose Size and select Volume Type
Important
If the project is locked?, you can’t use Commit, Repair or Add VM.
Kubernetes #
To access Kubernetes go to Projects – Servers – K8s Info or use the K8s button in Projects.

In Kubernetes tab can be found:
- Nodes
- Message, Reason, Status and Type
- Deamon Set
- Namespace, Name, Status and Age
- Persistent Volume Claim
- Namespace, Name, Phase, Size, Storage Class Name and Age
- Deployment
- Namespace, Name, Status and Age
- Config Map
- Namespace, Name and Age
- Secret
- Namespace, Name and Age
- Sts
- Namespace, Name, Status and Age
- Service *
- Namespace, Name, Type, External IP and Age
- Pods
- Namespace, Name, Node Name, Age, Status, Restart Count, Kill Pod, Terminal and Logs
- Ingress
- Namespace, Name, Hosts and Age
- Ingress
- Namespace, Name, Hosts and Age
- CRD (Custom Resource Definition)
- Name, Group, List Kind, Spec name kind, Labels and Age
- PDB (Pod Disruption Budgets)
- Namespace, Name and Created At
Warning
Please do NOT deploy any apps in monitoring Service, because Taikun uses the monitoring namespace heavily! And if you disable the monitoring, all pvc in monitoring will be deleted.

You can use sort buttons or search button in each section for easier searching.
Important
Except Pods tab are all tabs for preview only.
Actions #
Show description – for all tabs except Nodes
Pods #
Kill Pod #
Pod can be killed with Kill Pod button.
Terminal #
Open Terminal to control your container’s.

Logs #
Logs record events happening in cluster. You can check the logs for more details. To search the logs visit Projects – Project Details – Logs.

Create a New Project #
If you want to add a new project, use the upper right button in Projects tab.

Project Name – fill in your project name (only alphanumeric lowercase characters and dash are allowed, 3-30 characters; not underscore; e.g. my-project1)
Cloud – choose where you want to store your Project, create a new Cloud in Cloud Credentials
Access Profile – choose profile which can access the project, create a new profile in Access Profiles
Alerting Profile – if you have created profile in Alerting Profiles, you can choose it from the drop-down selection
Kubernetes Profile – first create a new profile in Kubernetes Profiles and than choose from drop down selection
- for openstack: if you choose profile with enabled Taikun Load Balancer, you also have to fill in Taikun Load Balancer Flavor, Router Id Start Range and Router Id End Range

Enable Auto Upgrade – Kubespray version will be automatically upgraded if new version is available
Enable Monitoring – monitoring a Kubernetes cluster allows easy management of containerized infrastructure by tracking utilization of cluster resources including memory, CPU, and storage
Enable Backup – choose credentials, you can create a new one in Backup Credentials. If you choose not to enable it, you can change it later, see Projects – Project details – Backup
Add Policy Profile – select a policy profile for the project
Add Expiration Date – set project durability, by default it is set to infinity. After the expiration date, your project is NOT affected, deleted or lock. It will stays the same.
Enable Spot – enable spots
- Allow Spot VM’s – allow spots in standalone VMs
- Allow Full Spot Kubernetes – allow full spot on kubernetes
- Allow Spot Workers – allow spot on workers
- No Spot for Kubernetes
Specify Kubernetes Version – select the kubernetes version for the project
Add Flavor – bind the flavor to the project, you can bind more than one flavor and un/bind them later in Flavor Info
Flavor Info #
Sort flavors by size of CPU and RAM or use search bar.
Warning
To use a flavor for Server in Project, you have to assign the flavor to the project first. You can do so during project creation or in Flavor Info tab.
Bind To Project #
Choose Organization, Cloud Type and Credentials where your project is stored. After selecting flavor’s you can bind it/them to the project.

An error message is displayed, if the flavor is already bound to the project.

Flavor Project Bounds/Unbind Flavor #
To overview all Flavors used in Projects use button. Flavors for each Cloud (Amazon, Azure, OpenStack) can be sorted by Name, Project Name, CPU and RAM.
To unbind a flavor from a specific project, choose a Cloud, select the project-flavor bound and use button.

Images #
Warning
To use a images for VMs in the project, you have to bind the image to the project first.
Quickstart Images – Bind to Project #
Choose Organization, Cloud Type and Credentials from drop down selection. After selecting image’s you can bind them to the project by clicking on the button

A success message is displayed for the successful image bound
An error message is displayed, if the image is already bound to the project.


With the same way images can be bound from the tabs My Images and Public Images
My Images – Bind to Project #

Public Images – Bind to Project #

Image-Project Bounds | Unbind Image #
To overview all images used in Projects use button. Flavors for each Cloud (Amazon, Azure, OpenStack) can be sorted by Name, Project Name and Size.
To unbind a flavor from a specific project, choose a Cloud, select the project-image bound and use button.

Audit Log #
You get real-time notification via Bell but you can also preview all the changes made in Audit Log.
See who (User Name) made a change (Category, Message), where (Project) and what time (When). Choose Start date and End date, Hours and Minutes for filtering if needed.

Clicking Project Name you get redirected to the project, where the change was made.
Filters

Events also can be filtered by:
- Organization
- Project
- User (with user role only)
- Action
- Added
- Backup
- Backup policy
- Created
- Deleted
- Failed
- Kubernetes
- Purged
- Rebooted
- Option
- Available
- Deleted
Download
#
You can download the report from Audit log with filters applied.
Users #
In Users tab is list of users for each organization. If you want change your settings, visit My Profile.
For each user you can preview following:
- Id
- User Name
- Display Name
- Role
- Approved
- Partner
- Creation Name
- Projects
- Actions

Find User #
To find user easier you can sort the list by User Name, Role and Organization Name or use the Search bar above the list. To preview users from one organization, use Select organization button above left.
Add User #
If you want to add a new user use the in the upper right corner.
Warning
You can create a new user with User or Manager role.

User Name – only alphanumeric characters and dash allowed
Display Name – name displayed in upper right corner (upper/lowecase and spaces allowed), optional
E-mail – new user’s e-mail address
Organization – enable button if you want to specify user’s organization
Role – enable button if you want to specify user’s role
Danger
Token will be sent to the provided e-mail address and it expires in 3 hours.
Token redirects the user to the page, where a new password will be set.
Projects #
Edit assigned Projects #
Use pencil in Projects column to assign user a project and update your changes.

Warning
You can assign a project to a user with User role only.
Info
You can also assign the project to the user in Projects.
Actions #
Edit User #
User Name – change user’s name
Display Name – change name displayed in upper right corner (upper/lowecase and spaces allowed)
E-mail – change user’s e-mail address. User will then use this e-mail to login and can confirm the e-mail in My Profile
Role – switch role between user and manager
Force User to Reset Password – user will be automatically logged out and receive mail with reset password request
User Disabled – logout and lock the user
Approved by Partner – if new user is not approved by partner, he won’t be able to login
Delete User #
If you want to delete some user, use the bin icon.
Warning
Warning
You can delete a user with User or Manager role. Back to topPreviousAudit LogNextProject Quotas
Project Quotas #
To filter projects use Select Organization drop-down field.
See CPU, Disk Size and RAM usage limits for every Project.

Change the usage limits to your Projects. You can edit the limits for CPU/Disk Size/RAM for each project with pencil button .

Info
To enter values, Unlimited has to be unchecked.
Keep in mind that the quotas are for the whole project, not for server.
Servers #
Select organization for a better overview of servers.
Sorting and Accessing Server #
You can find specific server with adjusting the CPU, RAM and Disk Size bars. Or the servers can be sorted by Project Name, Server Name, Organization Name, Role (Bastion, Kubemaster, Kubeworker), Status, Kubernetes Health or Creation Time. The search bar can help you find the specific server, too.
To access server details, click Project Name.

Clicking Organization Name you will be redirected to Dashboard, clicking the Project Name you will be redirected to Project’s details.
Show hidden columns #

Extend columns to see more:
- IP Address
- Flavor
- Created By
- Last Modified
- Last Modified By
For more information see Projects.
Taikun Requests #
Select organization for a better overview of Requests.
On this tab you can see all request made for Taikun. In the table you can see Organization Name, User Name, User role, Request Type, End Point, Ip, Status, Created At and Message.

Request Type:
- failed
- post
- put
- delete
- get
Status:
- 200 – ok
- 400 – bad request
- 403 – forbidden
- 404 – not found
- 500 – server error
Filter
Messages can be filtered by Organization, Request Type and/or by date.

Export requests #
The data displayed on the page are exported to .csv file, used filters are already applied.
Send requests to e-mail #
Use the button to send selected data to your mail provided in My profile.
Showback Rules #
Select organization for a better overview of Access Profiles.
When visiting the tab first you see overview of Showback Rules.

Every showback rule is described by ID, Name, Metric Name, Organization, Labels (if there is any), Kind, Type, Global alert limit, Project alert limit, Price, Showback credentials (if there is any), date and time Created and Actions.
Actions
Edit Showback Rule – change parameters of your rule
Copy Showback Rule – if you want to create similar rule, you can copy existing one, don’t forget to change rule name
Delete Rule – if you want to stop the rule, simply delete it
Add Rule #
Create a new showback rule for your organization.

Organization – choose organization
Name – choose name for your rule
Metric Name – use valid metric, you can use Metrics for examples
Kind – choose kind for the rule
- General – data source is taikun
- External – data source is external – you need to change Showback Credentials
Type – drop-down: Count (calculate package as unit – e.g. flavors) or Sum (calculate per quantity – e.g. GBs)
Price – billing in CZK per selected unit
Project Alert Limit – set limit of alerts for one project
Global Alert Limit – set limit of alerts for all projects
Showback Credentials – drop-down of operation credentials
Labels – the label indicates the variable name (Label) and value of the label (Label Value), see examples in the Table 1 below
Table 1: Labels in Showback Rules
Label | Label Value |
---|---|
Flavor | n0.xmedium |
taikun_org_name | itera |
taikun_org_id | 2 |
Warning
Once you add the rule the cron job starts to calculate. The price for showback summary starts at the beginning of every hour and it can’t be paused. Rule is stopped by deleting it.
Showback Summary #
Select organization for a better overview of Access Profiles.
Showback Summary includes overview of Showback Rules with price. Rules calculate the price from time the rule is added but the page is updated at the beginning of every hour. Is you want to stop the price, you have to delete the rule (cannot be paused).
Table contains ID, Name and Price.Bold Name is rule and its Price is sum of all projects with this rule bound.

Export #
The data displayed on the page are exported to .csv file – with name of your organization and time period (if selected).
Send To Email #
Use the button to send selected data to your mail (provided in My Profile).
Charts #
Data is also plotted in doughnut and line charts. You can switch between them with toggle switch.

Line chart can be filtered by Available or Deleted, Monthly and Yearly graphs are plotted only if there is enough data.
Ticketing #
Select organization for a better overview of Ticketing.
Ticketing is Taikun’s supporting system for your issues, problems and questions. The page is divided into 4 section. In each you have different options.
1) New
- create a new ticket
- update the ticket – Name and Description (only if you are owner/creator of the ticket)
- delete the ticket (only if you are owner/creator of the ticket)
- transfer the ticket to another user (Manager or Partner role only)
2) Open
- update the ticket – Name and Description (only if you are owner of the ticket)
- transfer the ticket to another user (Manager or Partner role only)
- add a comment
- delete the comment – only the last one and added by your user
- transfer the ticket to Closed (only if you are owner of the ticket)
3) Closed
- transfer the ticket to another user (Manager or Partner role only)
4) Archived
- transfer the ticket to another user (Manager or Partner role only)
How to raise a ticket #

Use plus button to create a new ticket. Fill in Name and Description for ticket. Please describe the problem as detailed as possible.
Now you have 3 options:
1) Update the ticket, if you have any new information.

Just click on the ticket and update the fields you want to change.
2) Delete the ticket.

Ticket can be only deleted by ticket owner and only with status New.
3) Let our guys to take care of the ticket.
If you have nothing more to add to ticket, leave it in New section and it will be soon taken care of from our support.
Transfer ticket #
Transfer the ticket to another user e.g. if you think he’s more reliable to take care of the ticket. Ticket can be transferred to to another user (Manager or Partner) from your organization in section:
- New
- Open
- Closed
How to deal with ticket with Open status #
Once a ticket is in Open section, it is already taken care of or is waiting for the problem to be solved. You can add a comment to the ticket and you can do so only in Open status.
Once the problem is solved you can transfer it to Closed.

After the issue is solved CSM will transfer the ticket to Archived.
Standalone VMs #
Select organization for a better overview of servers.
Sorting and Accessing Virtual Machine
You can find specific server with adjusting the CPU, RAM and Volume Size bars. Or the VMs can be sorted by Name, Flavor ID, Volume Type, Project Name or Status (Ready, Updating, Deleting, Failure). The search bar can help you find the specific server, too.
To access server details, click Name or Project Name.

Show hidden columns

Extend columns to see more:
- Image Name
- IP Address
- Public IP
- Revision
- Created By
- Created At
- Last Modified
For more information see Projects.
Chargeback #
Select organization for a better overview of Rules.
The Chargeback tab is the overview of prices for every billing rule. The Billing rules calculate the price from the moment they were assigned to the organization. Here you can set a real billing period. Change the Start date and End date, you can adjust the measured time period (for example from the beginning to the end of the month).
In the table there are presented:
- Rule Name
- Price
- Start Date
- End Date

For a better overview the table can be sorted by Rule Name or Price.
Export Chargeback data #
The data displayed on the page are exported to .csv file – with name of your organization and time period (if selected).
Send Chargeback Data To Email #
Use the button to send selected data to your mail (provided in My Profile).
Price Development #
Graph for Price Development shows decrease and increase of prices for every rule. You can change the timeline – Daily, Monthly and Yearly.

Warning
Monthly and Yearly graphs are plotted if there is enough data.
Usage Reports #
Select organization for a better overview of Projects.
For every Project you can see its TCU for time period limited by Start Date and End Date.
Sort data by Project or TCU and filter them by choosing available or deleted projects.
TCU
- Taikun Compute Unit
- total CPUs and GB of RAM used in Project (TCU = CPU + RAM (in GB))

As you can see, the Total TCU changes immediately.
Clicking the project will redirects you to project’s info (naturally works only for available projects).
Export Reports #
The data displayed on the page are exported to .csv file – with name of your organization and time period (if selected).
Send Reports to E-mail #
Use the button to send selected data to your mail (provided in My Profile).
Price Development #
Graph for Price Development shows decrease and increase of prices for every project. You can change the timeline – Daily, Monthly and Yearly.

Warning
Monthly and Yearly graphs are plotted if there is enough data.
Cloud Credentials #
Select organization for a better overview of Cloud Credentials.
See all projects for each hosting provider:
- AWS
- Azure
- OpenStack

Cloud can be empty but also may include multiple projects. Each Cloud has different specifics, can be sorted differently and some columns can be expanded.
You can expand all tables to see the last modification made (Created By, Last Modified, Last Modified By).

Actions #
Make default – choose credentials which will be then filled during project creation, lighter color indicates selected credentials
Update Cloud Credentials – change the credentials which are not locked
Navigate to OpenStack/Azure Quota Charts – Preview the quotas from your cloud
- you can also filter Azure usage quotas by cpu, storage, gallery or general

/
Un/lock credentials – if you lock the credentials, you can’t use them in new Project, edit or delete them
Delete – delete empty and unlocked credentials
New Cloud Credentials #
Use button to Add Cloud Credentials. Choose which Cloud you want to add and fill in the required data. After you add new Cloud Credentials, you can use the Cloud as storage for your new projects.
Requirements for Openstack #
Danger
For a good working OpenStack in Taikun, you have to create image in OpenStack. Requirement is an Ubuntu 20 image and we recommend using a recent kernel, e.g. a base Ubuntu image with hwe kernel here: https://repo.itera.io/repository/images/taikun-image.qcow2
To use the image in Taikun you have to use the tags "taikun" and "ubuntu{number}”. By default Taikun will take image with the latest {number}.
Command to add an image to openstack:openstack image create --disk-format qcow2 --container-format bare --public --tag taikun --tag ubuntu20.04 --property hw_disk_bus=scsi --property hw_scsi_model=virtio-scsi taikun-focal-image --file taikun-image.qcow2
See Projects – Create A New Project or Guidelines – Add Cloud Credentials.
Backup Credentials #
Select organization for a better overview of servers for individual projects.
Create new credentials #

Organization – choose organization from drop-down selection
S3 Name – name for backup credentials (3-30 characters)
Fill the remaining S3 data from Amazon and add new backup credentials. See endpoints from AWS.
Invalid S3 credentials error can pop up if you fill in wrong/non-existent credentials.
After you add the credentials, you can backup the project by Enable Backup and add Backup Policy.
Backup credentials #
Use the search field for finding the credentials needed.
Every Credential has its:
- ID
- Organization
- S3 Access Key ID
- S3 Endpoint
- S3 Name
- Associated Projects
- Actions

ID and Organization are immutable.
S3 Access Key ID, S3 Endpoint and S3 Name are security credentials.
In Associated Projects are listed all projects using these backup credentials.
Created By informs you who has made the last change.
Look here, if you don’t know where to find your AWS credentials.
By expanding the table, you can see the last modification made (Last Modified, Last Modified By).
Actions #
Make default – choose credentials which will be then filled during project creation, lighter color indicates selected credentials
/
Lock/Unlock Credential – if you lock the Credentials, you disable it for Backup and cannot be deleted. Unlock it to enable it again.
Delete – you can delete only empty Backup Credentials
For some example see Guidelines – Backup.
Billing Credentials #
Select organization for a better overview of Billing Credentials.
In this tab you can find all sources from Prometheus for the Billing. Use Select Organization to sort the credentials.

By expanding the table, you can display Prometheus Password and the last modification (Last Modified and Last Modified By).
Actions #
Delete – you can delete only empty credentials
Make default – choose credentials which will be then filled during project creation, lighter color indicates selected credentials
Add New Credentials #
To create a new credentials, use button. You can add credentials only for your organization.

Organization – choose which organization you want to set the billing
Name – choose name for your billing credentials (3-30 characters)
Username and Password – use your Prometheus credentials
Url – insert URL where is the source
Showback Credentials #
If you want to use external source for your Showback rules, add Showback Credentials you then will want to use.
Select organization for a better overview of Rules.
See table of added Showback credentials.

Table consist of ID, Name, Organization, URL, bound Rules, date and time Created and Actions.
Actions
Lock the credentials – then credentials cannot be used in Showback rules and cannot be deleted
Unlock credentials – then credentials are unlocked and you can use them again
Delete credentials – if no longer needed
Add New Credentials #
With Add Credential you can create a new showback credentials.

Organization – choose organization from drop-down selection
Name – choose name for your Showback Credentials (3-30 characters)
URL – add URL of the source
Username and Password – use your Prometheus or other credentialsInfo
After you successfully added the credentials, you can see them in overview. Back to topPreviousBilling CredentialsNextKubernetes Profiles
Kubernetes Profiles #
Select organization for a better overview of Kubernetes Profiles.
Each Profile is characterized by ID, Name, Organization Name, CNI (Container Network Interface), Octavia, Proxy on Bastion, Projects and Actions.

Expand the table to see the last modification (Last Modified and Last Modified By).
Add Kubernetes Profile #
You can create a new profile where you can enable a few features, which you can customize with CNI plugin.

Organization – choose organization for your profile
Profile Name – name for your kubernetes profile (3-30 characters)
Octavia #
Exposes the Service externally using the load balancers from OpenStack.
Enable Taikun Load Balancer
Manage your traffic, only available for OpenStack and Octavia disabled.
Proxy on bastion #
Exposes the Service on each Node’s IP at a static port, the NodePort. You’ll be able to contact the NodePort Service, from outside the cluster, by requesting NodeIP:NodePort.Info
Choose this profile with enabled features during project creation.
Enable Unique Cluster Name
If not enabled, the cluster name will be cluster.local
Actions #
/
Un/Lock the profile to dis-/enable it from drop-down selection when a new project is created, you cannot lock default profile.
Delete the profile if it is no longer needed. Only profiles with no associated projects can be deleted. You cannot delete default profile.
Access Profiles #
Select organization for a better overview of Access Profiles.Info
When using ssh to connect to the servers, please DO NOT use user ubuntu. It is already in use by Taikun for the management of the cluster.
Without internet access and to keep your security, you can download the packages, docker images, etc. using a proxy server.

You can extend the table to see the last modification (Last Modified and Last Modified By).
Actions
Edit Http Proxy – update address
Delete access profile, you cannot delete default profile
Add Access Profile #
Create a new profile to access a specific project.

Organization – choose organization form drop down section
Name – choose name for a new profile
Http Proxy – enter http proxy
SSH Users – fill user (3-30 characters) and it’s public SSH key
- type of key must be RSA, ECDSA or Ed25519
DNS – for access you can also use DNSDanger
Danger
DNS will be ignored, if you choose import network in new Cloud Credentials.
NTP – or use NTP for accessing
If you want to change any of these parameters, you can do it with Show button and update the fields.
Alerting Profiles #
Select organization for a better overview of Alerting Profiles.
If you want to receive notifications when there is some alert in you project, just set the alerting profile and attach it to the project.
Add Alerting Profile #
If you want a new alerting profile, use button.

Organization – choose from drop-down selection of organizations
Name – choose name for your alerting profile
Slack Configuration – if you have created a slack configuration, you can use it in profile
Reminder – set the reminder for None, HalfHour, Hourly, Daily
E-mails – receive notifications with e-mail
Webhooks – use webhooks for application alert
Integrations – set notifications for different apps (Opsgenie, Pagerduty, Splunk and MicrosoftTeams)
Alerting Profile overview #

Each Profile is described by ID, Name, Organization Name, Slack Configuration Name, Associated Projects, E-mail, Webhooks, Created By and Actions.
You can change or add more E-mails and Webhooks. To each webhooks you can add multiple headers (Key, Value).
You can extend the table to see the last modification (Last Modified and Last Modified By).
Actions #
Un/Lock the profile to dis-/enable it from drop-down selection in project, you cannot lock default profile
Update Name or Slack Configuration
Delete the profile if it is no longer needed, only profiles with no associated projects can be deleted, you cannot delete default profile
Attaching the Profile to the Project #
There are 2 ways to attach your alerting profile to the project:
- when project is created – just check Add Alerting Profile during project creation
- after project is created – use drop-down selection Actions in project, click Attach Alerting Profile and choose which profile you want to attach to the project
Detach Alerting Profile #
Use drop-down selection Actions in project, click Detach Alerting Profile and choose which profile you want to detach to the project.
Policy Profiles #
Profile uses OPA (Open Policy Agent) to centralize operational, security, and compliance.
Select organization for a better overview of Alerting Profiles.
Accessing the page you can see the overview of all created profiles with selected rules and associated projects.

Each profile can be:
/
Un/lock profile – if you lock the profiles, you can’t use them for new Project, edit or delete them
Delete – delete non-used and unlocked profiles
Update Profile – update policy profile
Make default – choose profile which will be then filled during project creation, lighter color indicates selected credentials
Add Policy Profile #

Name – choose name for the profile
Features:
Forbid NodePort
Forbid http ingresses
Require Probe
Add:
Allowed Repositories
Forbid Specific Tags
Ingress Whitelist
Add Profile to the Project #
You can add the profile during project creation – choosing from drop down selection.

Enforce Policies after the project is created. You can disable it the same way.

Warning
Please keep in mind that namespaces monitoring, velero and kube-system violate these policies.
Standalone Profiles #
Select organization for a better overview of Standalone Profiles.
Warning
You cannot add a new VM without any standalone profile, please create a new one first.
See all profiles created for your organization. Each profile is described by its ID, Name, Public Key, Security Group (redirects to another page) and to which VM the profile is associated.

Actions
/
Un/lock profile – if you lock your profile, you can’t use it for VM, edit or delete it
Delete – delete non-used and unlocked profiles
Update profile – update policy profile
Add Standalone Profile #
Create a new profile to access your virtual machine.

Name – choose name for your profile
Public Key – insert your SSH public key to access the VM
Security Groups – optional, protocols ICMP, TCP and UDP are supported.
Warning
Once the profile is created SSH key cannot be edited.
Organizations #
Organize your structure with organizations – which can be then connected with users, projects, etc. The organizations will also help you for a better overview at each site (by drop-down selector).

Show hidden columns will expose Billing E-mail, Phone, VAT Number, Country, City, Address, Read Only and Discount Rate.
Actions #
Edit Assigned Rule
Add new rules in Billing rules and then you can assign it to organization with Edit Assigned Rule option.
Edit Organization
Update organization info.
Delete Organization
You can delete only unlocked empty organization (no Users, Projects, Servers or Cloud credential).
Add Organization #
Fill in Name and Full Name for your new organization and add it.

Compulsory fields:
Name and Full Name – is chosen by you (alphanumeric, 3-30 characters; dot, dash and underscore are allowed)
Discount Rate – is in percents and values can be between 0 – 1000, where 100 is default value. If you set the value to 70, it means 30% discount, value 130 means 30% charge. This is only for external billing.
All these can be changed after adding a new organization when editing it.
Billing Rules #
Create a Rule, assign it to the organization and see the result in Chargeback.

Rules can be sorted by Name, Metric Name, Created and Type.
By clicking arrow > you can expand the table to see Created By, Last Modified and Last Modified By.
New Rule #
To create Rule use button.

Name – Rule name
Metric Name – exact metric name from Prometheus (e.g. volumes, flavor, networks) you want to bill, if you select Billing credentials first, you can choose from drop-down selection (wit autocomplete)
Bind rule to organization – assign rule to selected organization or choose none and bind it later
Billing Credentials – drop-down of operation credentials
Type – drop-down: Count (calculate package as unit – e.g. flavors) or Sum (calculate per quantity – e.g. GBs)
Price – billing in CZK per selected unit
Price Rate – in percents (0-1000 %), 100 equals one
Add Label – The label indicates the variable name (Label) and value of the label (Label Value), see the Table 1 below
Table 1: Labels in Billing Rules
Label | Label Value |
---|---|
Flavor | n0.xmedium |
taikun_org_name | itera |
taikun_org_id | 2 |
Warning
Once you bind the organization the cron job starts to calculate. The billing starts at the beginning of every hour and once it’s bound to organization, it can’t be paused.
Actions #
Change the properties of the rule.
Bound Organizations #
Select the organization you want to assign the rule and then click the assign button. If you choose a new organization the billing starts from the beginning of next hour.
Edit Prometheus Info #
Update the rule and change the parameters.
Copy Rule #
When creating similar rule, when you want to change just one or few parameters, you can use copy button – window with copied parameters will pop-up.
Delete #
Delete the rule if no longer needed.
Slack Configurations #
You can receive all the changes made from your Taikun organization into Slack channel you choose.

Add Slack Config #
First you need to set your webhooks for Slack and create channel in Slack, where you want to receive notifications.

Organization – choose organization to which you want to add slack
Name – choose name for your config
URL – insert webhook URL from Slack app
Channel – Slack channel for notifications
Type – Alert (receive only alert-type of notification) or General (receive all notifications)
Successful installation
Now you will receive notifications in Slack channel for the projects.

Info
The project name in message has link, which will redirect you right to Taikun to the project. Back to topPreviousBilling RulesNextMy Profile
My Profile #
You can access your profile and its settings by clicking in the right corner of the page.
My Information #
Here you can see your User Name, Organization Name, E-mail and Role.

Settings #

In Settings section you can:
- Change your password
- Change your e-mail
- Enable e-mail notifications from Taikun
- Delete Account
- Password should contain at least 1 uppercase, 1 lowercase, 1 number, 1 non alphanumeric and be minimum 6 signs long.
Change E-mail #
You just need to type your new e-mail, which you want to use in the future.

Your e-mail address is changed but not confirmed, which is indicated with red cross next to your e-mail in My Information.

Clicking the Confirm E-Mail button will send the confirmation token to the e-mail address provided by you. Use the link in the mail to confirm your mail. If the link redirects you to homepage of Taikun, please login first and click the link in the e-mail again.
Token expires after 1 hour and then you need to send it with Confirm E-mail button again.

info
You can’t change e-mail address until your current one is confirmed.
Change Password #
To change your password, you have to insert your current password (old) and new (different) one.
Password should contain at least 1 uppercase, 1 lowercase, 1 number, 1 non alphanumeric and minimum length is 6 signs.
Warning
If you receive an error during changing the password, please check it meets the conditions.

Danger
After confirming the password (by clicking the update button), you are logged off and need to log in with the new password.
Delete Account #
If you no longer wish to use Taikun, permanently delete your account. You will lose all access to Taikun.
Partner #
See information about your organization, you can also update them here.

Choose logo #
Upload logo in upper right corner of the page. This logo will redirects you to link provided in second column.
Choose background #
Upload background image, which can be seen at login page.
For best result image should meet conditions below: