With Taikun, you can create a Kubernetes profile customized to your needs. This means you can optimize your Kubernetes environment for your specific use case, whether for development, testing, or production.
Creating a Kubernetes profile in Taikun is a straightforward process that can be done in just a few steps. Once you are creating a Kubernetes profile, you can easily edit parameters to adjust settings to your liking.
There are many benefits to customizing a Kubernetes profile. You can save time by streamlining your Kubernetes environment and automating specific tasks. Additionally, you can optimize your infrastructure to improve performance.
Kubernetes profile is default by default, but you can create a new profile with a custom configuration and associate it to a Project. Read more about Projects.

- Log in to your Taikun account with your username and password.
- Search for the “Profiles” tab in the left navigation bar.
- From there, click on the “Kubernetes Profiles” option.
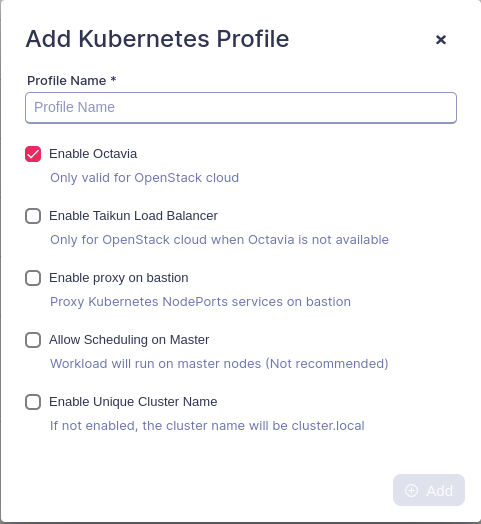
- Click the “Add Kubernetes Profile” button in the top right-hand corner.
- Choose a name for the Profile.
- You can edit additional parameters:
- Enable Octavia: Enable the LoadBalancer service from Openstack.
- Enable Taikun Load Balancer: Enable the Taikun LoadBalancer for Openstack cloud, if Octavia is not configured.
- Enable proxy on bastion: Exposes the NodePorts port on your project’s Access IP. Read more about NodePorts
- Allow Scheduling on Master: Enable the pods schedule also in the Kubemaster, and not only in the Kubeworkers (not recommended).
- Enable Unique Cluster Name: Rename the cluster domain to your project name. By default, the cluster name is cluster.local.
7. Click “Save” to create the new access profile.


