

Storage is one of the most important aspects to take care of while dealing with containers in any architecture. By default, the data within the container is destroyed with the container. This makes it difficult for other containers to access the data and carry the process forward.
In architectures of scale, container orchestration is internalized by tools like Kubernetes and Docker. This means that multiple containers are created, managed, and destroyed within the same workflow. For this to work, we need persistent container storage, as data must be shared among multiple containers.
In this blog, we will see how to handle container storage using one of the most common containerization tools, Docker. Let’s start with the default setup.
Docker’s default storage
As you may remember from our blog on Docker, the Docker image is multi-layered. The image has a base layer with other layers building on top of it. Every time a container is created from the image, a new container layer is created, which is writable.
The container layer is the storage space where all the data from the running of the container is stored. The layer can create new files, modify existing files and delete them as required. Since the container layer is isolated from the host and other containers, the data remains within the container.
Hence, the same image can have multiple containers with their own separate data stored. in each of them. You can see how to create containers from an image in our blog here.
How data is stored
This writable layer in the container is closely linked to the host machine. This makes it difficult to remove just the data from a container and move elsewhere. This means that existing data in the container cannot persist if the container is destroyed.
A storage driver manages the file system within the container. The storage driver creates an abstraction over the host filesystem using the Linux Kernel.
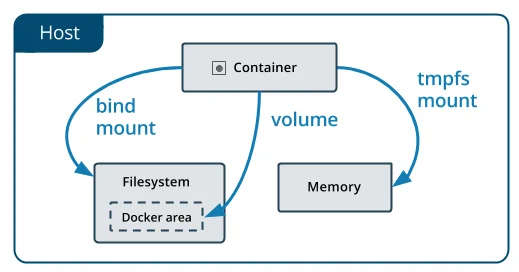
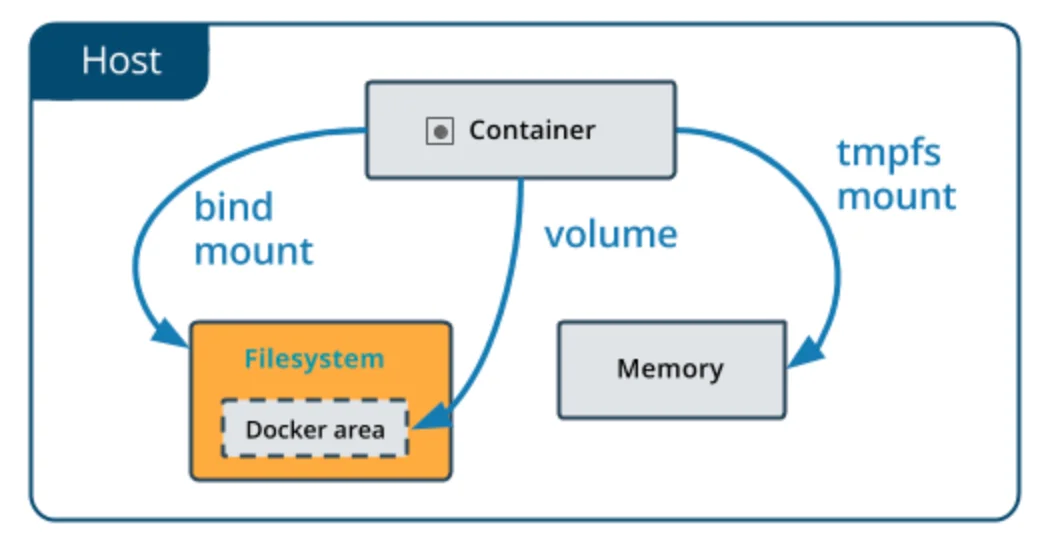
Docker also has the option to store container data in-memory on the host machine. For Linux hosts, tmpfs mount is used to store files on system memory. For Windows’ host, named pipe is used for the same.
tmpfs mount
tmpfs mount is a non-persistent way to store container files in memory for containers on a Linux host. This is a useful method when the container is dealing with sensitive data and you do not want to store it on the host machine or container’s writeable layer.
Note that tmpfs mounts are temporary and remain in the host’s memory till the container is running. It is removed as soon as the container stops.
To use tmpfs mount while running a container, use one of the below commands on a Linux host:
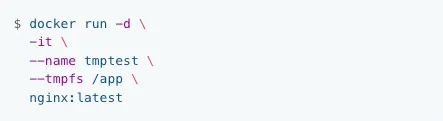
You can either use the –mount flag or the –tmpfs flag to use a tmpfs mount. The above commands create a tmpfs mount for an Nginx container on the folder /app.
There are, however, many instances when a more persistent storage option is desired. Let us see how that can be achieved.
Creating persistent container storage
To make data of any container persistent and accessible outside of the container, Docker provides two options:
- Volumes
- Bind mounts
Both options store the data in files on the host machine. This helps in accessing data even when the container is not running. Let us discuss each of these methods.
Volumes

Volume is one of the most popular ways to achieve persistent container storage. Volumes are managed directly by Docker. This makes them perform better than bind mounts on the host. Unlike bind mounts, volumes are not dependent on the directory structure on the host or the OS of the host machine.
Volumes work with both Windows and Linux hosts. The data in these volumes can also be shared securely between containers. Since volumes are independent of the underlying host OS, they are easier to back up and migrate to other systems.
This mechanism also allows storing volumes on remote hosts like, say, a cloud provider. It has the capability to encrypt the contents of the volumes.
Another key benefit of using volumes over a container’s writable layer is that the data does not increase the size of the container. This separation of the data from the container makes it independent of the life of the container. You can also attach new volumes with a container and pre-populate the content.
Here’s how to create and use a volume as container storage. Run the docker volume command to create a volume.
$ docker volume create myvol2
The above command creates a volume called myvol2. You can check if the volume is properly created with a docker volume ls command.
$ docker volume ls
local myvol2
To attach a container to a volume, run the below command.
$ docker run -d \
–name devtest \
–mount source=myvol2,target=/app \
nginx:latest
This will start an nginx container named devtest and attach it to the new volume we created, myvol2 and link it to /app in the host system.
To remove the volume, you need to stop the container first and then remove it with the docker volume command.
$ docker container stop devtest
$ docker container rm devtest
$ docker volume rm myvol2
You can read more about working with volumes in the Docker’s documentation.
Bind mounts
Bind mount is another way for persistent container storage. Their functionality is less versatile than volumes. One of the main differences in a bind mount is that a file/directory on the host system is mounted into a container and referenced by its absolute path on the host machine.
This is as opposed to the volumes where the directory is created within Docker’s storage and Docker is responsible in managing its contents.
Bind mounts requires host machine to have a specific directory structure. Here is an example of a bind mount:

Above command must be run from within the source directory in the host machine. The pwd sub-command in the source parameter will expand to the current working directory. The command will thus bind-mount the <source>/target directory on the host machine to /app directory in the container.
Bind mounts work with both Windows and Linux host machines. You can read more about bind mounts in the Docker documentation.
And that is how we can handle container storage in Docker. Before we wrap up this topic, let us also learn a bit about storage drivers in Docker.
Understanding storage drivers
Storage drivers help Docker store image layers and store data in the writable layer of a container. If you need a refresher on how an image and a container are different, you can read about them in our previous blog.
A container’s writable layer stores all the runtime data. Since containers are meant to be lightweight, storage drivers are optimized for space efficiency.
Since space efficiency is prioritized over write speeds, storage drivers can perform at slower write speeds than native file systems for write-intensive applications.

There are many storage drivers to handle different container needs. All storage drivers use stackable image layers and copy-on-write (CoW) strategy. Let us look at CoW in some detail to understand how data is stored, read and modified inside a container.
Copy-on-write (CoW) strategy
In a CoW strategy, if a lower layer has data required by any of the layers above, read access is given to the existing data. If the data needs to be modified by any layer, only in that case, the data is copied and then modified.
The copy-on-write approach reduces I/O to situations when the data needs to be modified. It also reduces the size of each layer as data need not be copied for read access.
You can read more about storage drivers in Docker documentation.
Taikun – Container management in easy steps
As you start using containers for your application, you will need to manage hundreds of containers across many infrastructures. This is where having a common dashboard for container status monitoring can be of great help.
In addition, managing container storage can get quickly complicated. It would also require a lot of capital investment in a highly technical team. What is needed is a dashboard with a simple, intuitive interface that can help remotely manage all container deployments, create new ones and destroy old ones with a few clicks.
That is where Taikun by Itera.io can help.
Taikun is a cloud-based central management console and monitoring dashboard for all your container needs. Taikun can work in private, public, and hybrid cloud environments with most of the major cloud providers like Google Cloud, Microsoft Azure, AWS, and RedHat Openshift.
