


In our series on Kubernetes so far, we have covered an entire gamut of topics. We started with a comprehensive guide to help you get started on Kubernetes. From there, we got into the details of Kubernetes architecture and why Kubernetes remains a pivotal tool in any cloud infrastructure setup.
We also covered other concepts in Kubernetes that are useful to know, namely, namespaces, workloads, and deployment. We also discussed a popular Kubernetes command, kubectl, in detail.
We also covered how Kubernetes differs from another popular container orchestration tool, Docker Swarm.
In this blog, we will consolidate all our learnings and discuss how to run applications on Kubernetes. Although we covered this topic in bits, we feel this topic deserves a blog of its own.
We will cover two kinds of applications that are commonly run on Kubernetes-based cloud infrastructure:
- Stateless application, and
- Stateful application.
In both cases, we will use an Nginx application. Let’s get started.
Running a Stateless application
A stateless application basically stores no past data or state when new pods or containers are created. This is good for applications that do not rely on persistent storage of any kind. Many microservices applications, printing services, or CDNs would fall into this category.
Since Stateless applications do not require persistent storage, running them on Kubernetes is much more straightforward. Let’s see an example to understand.
Kubernetes infrastructure
To run this example, you would need a Kubernetes setup to run the application on. If you do not have one, you can build one on Taikun for free. Taikun is a complete management and monitoring solution for Kubernetes of any size across any cloud infrastructure.
If not, you can set up one locally using minikube or use Killercoda to run one on the browser itself.
Nginx deployment on K8s
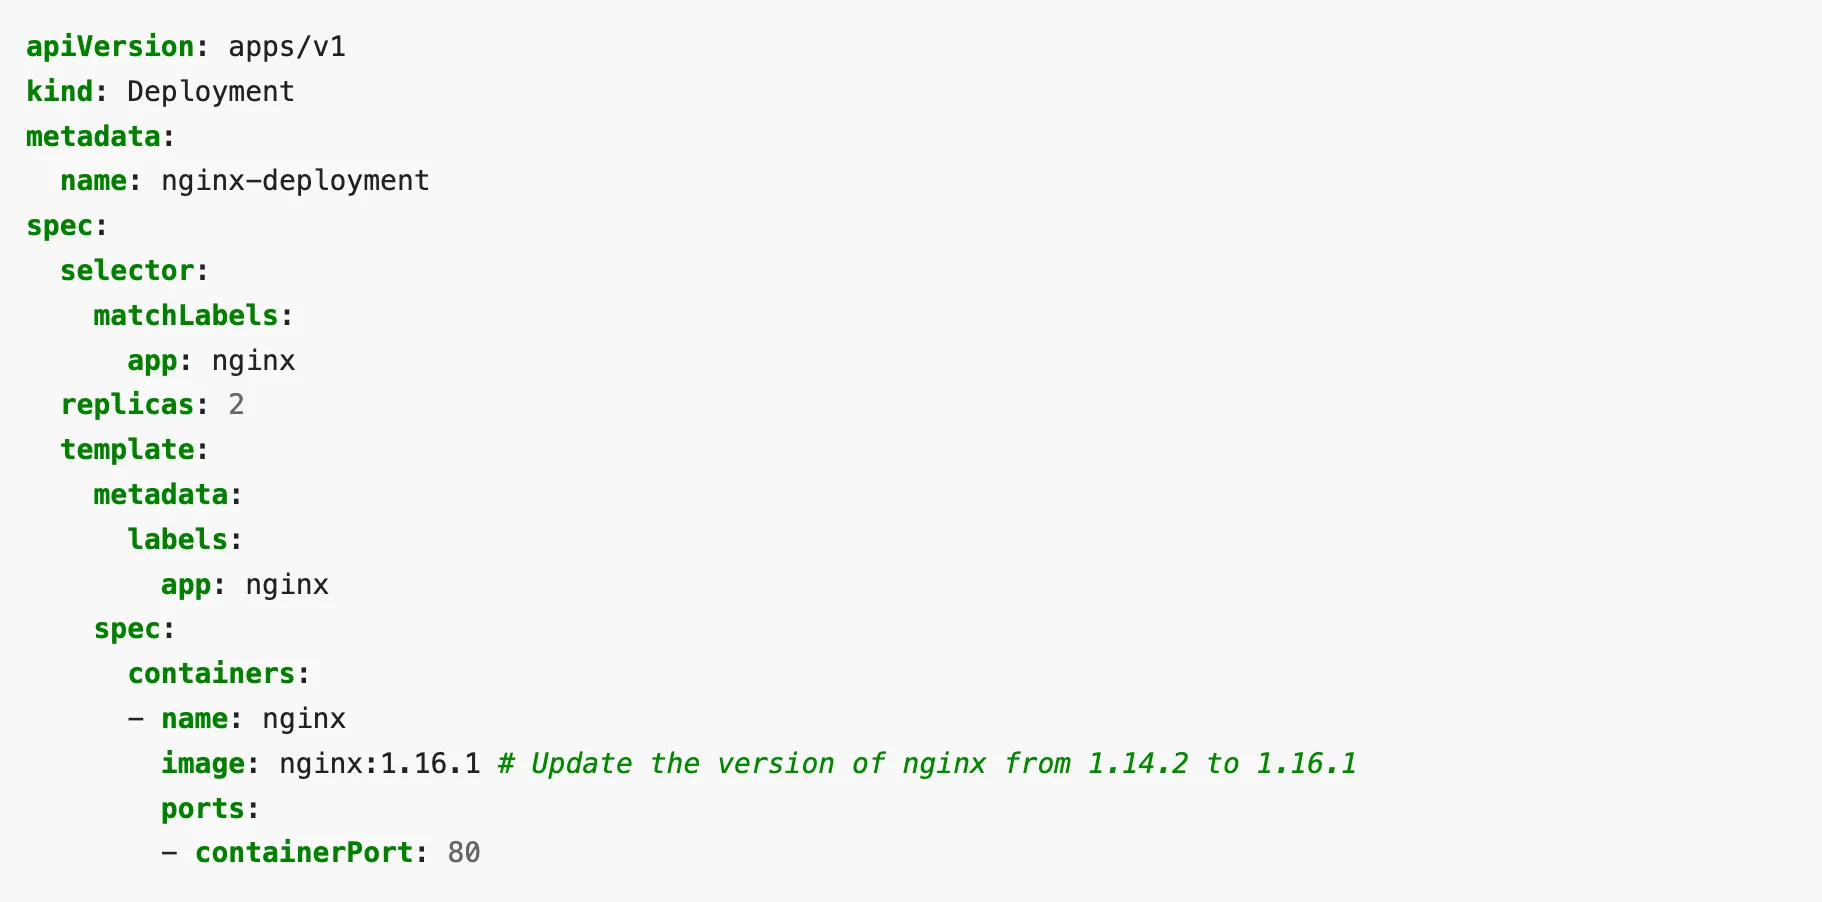
To deploy Nginx on Kubernetes, we first need to write a YAML file that describes the desired state as a Deployment object. We can use a sample provided by Kubernetes documentation itself:
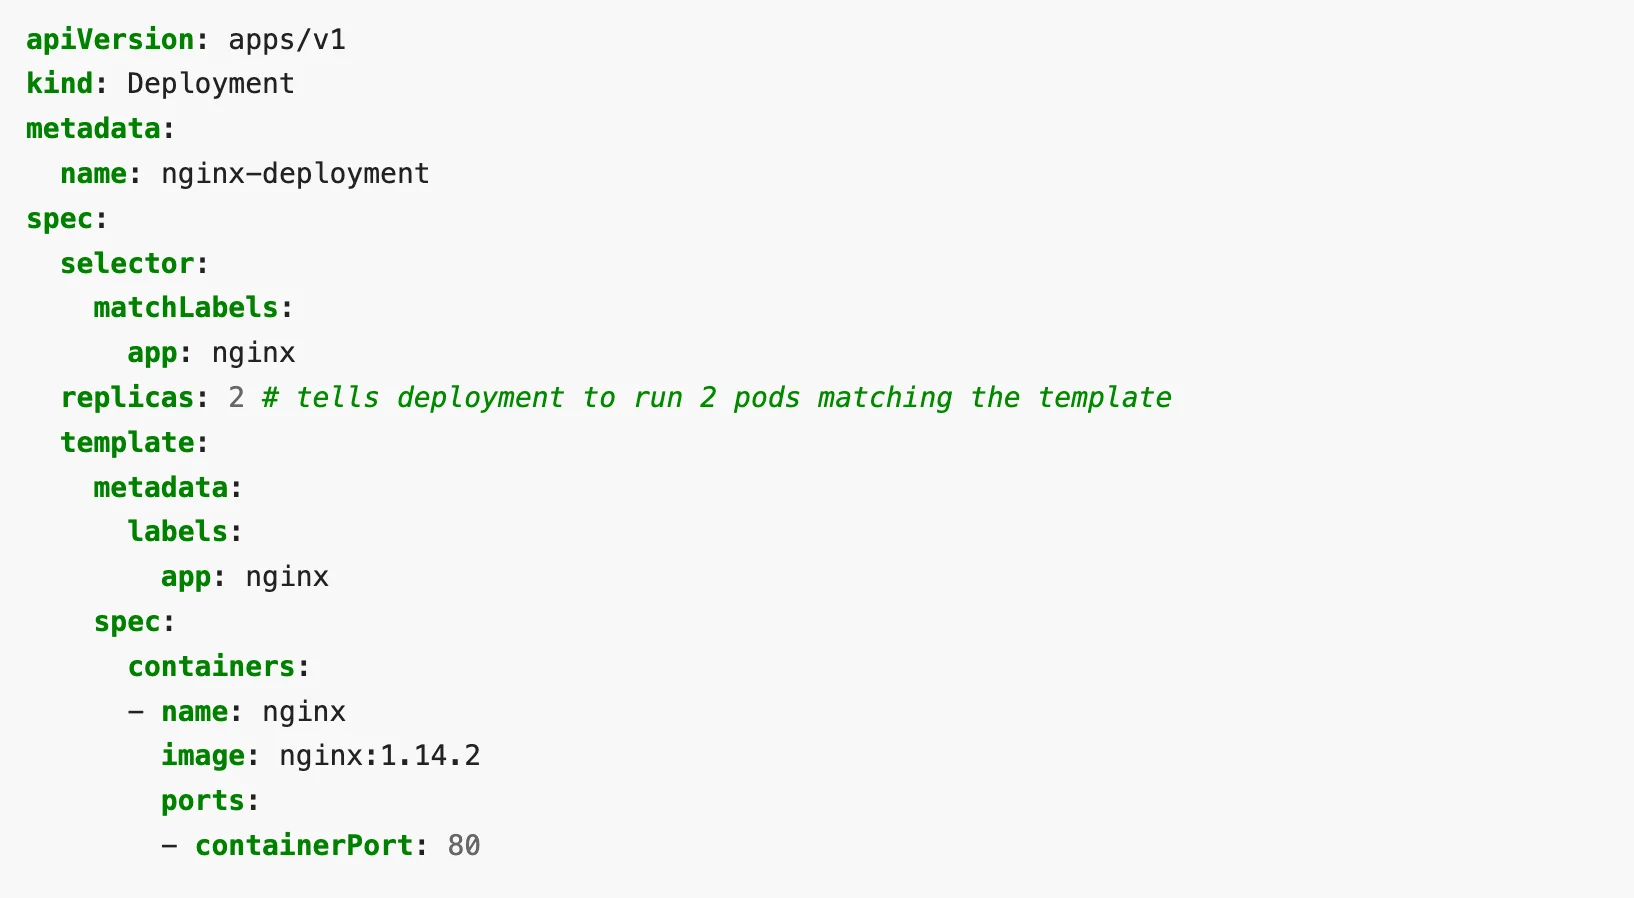
You have to apply the file using the kubectl command. This tells kubectl about the desired state of the system. You can read more about what kubectl does in the background in our kubectl blog.
You will see an output similar to the one below:

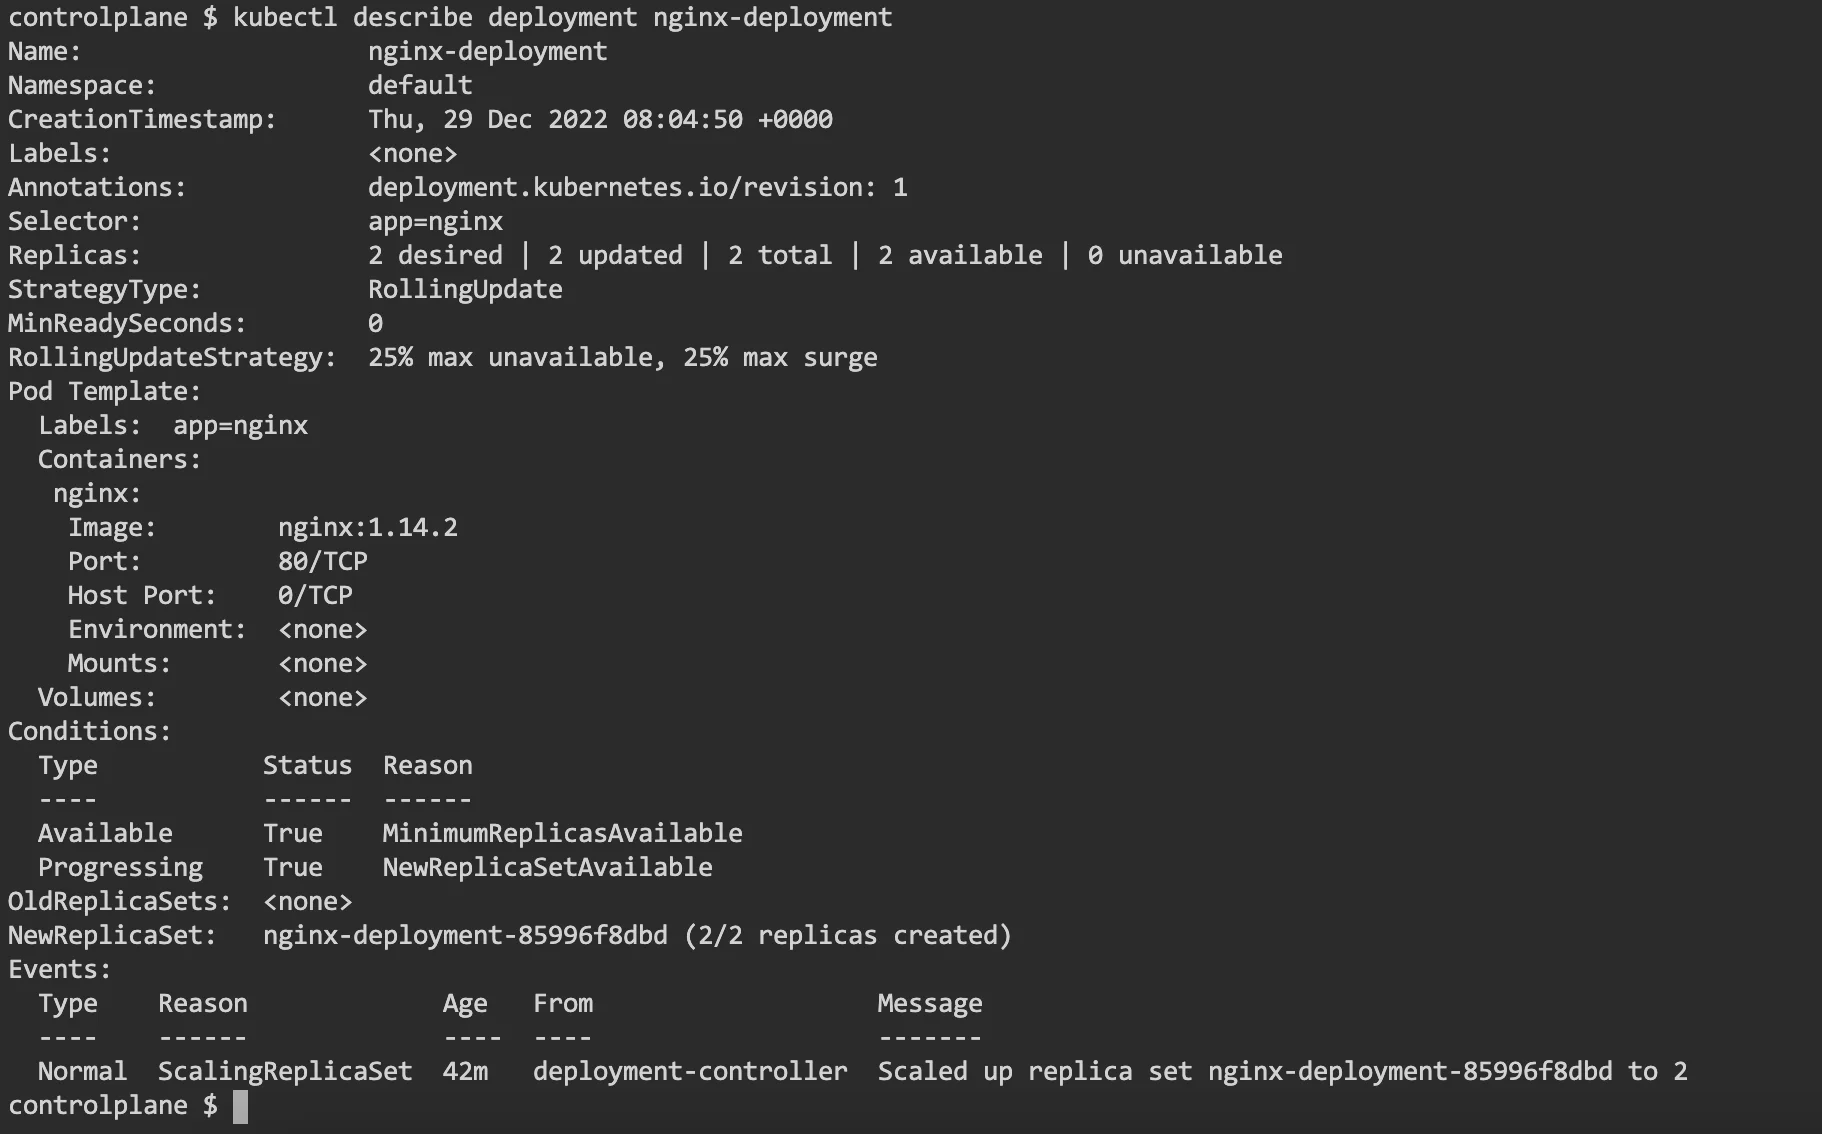
You can check if the deployment was successful with a describe sub-command. You should see an output similar to the one below:
You can also list the pods in the deployment with a “get pod” sub-command.

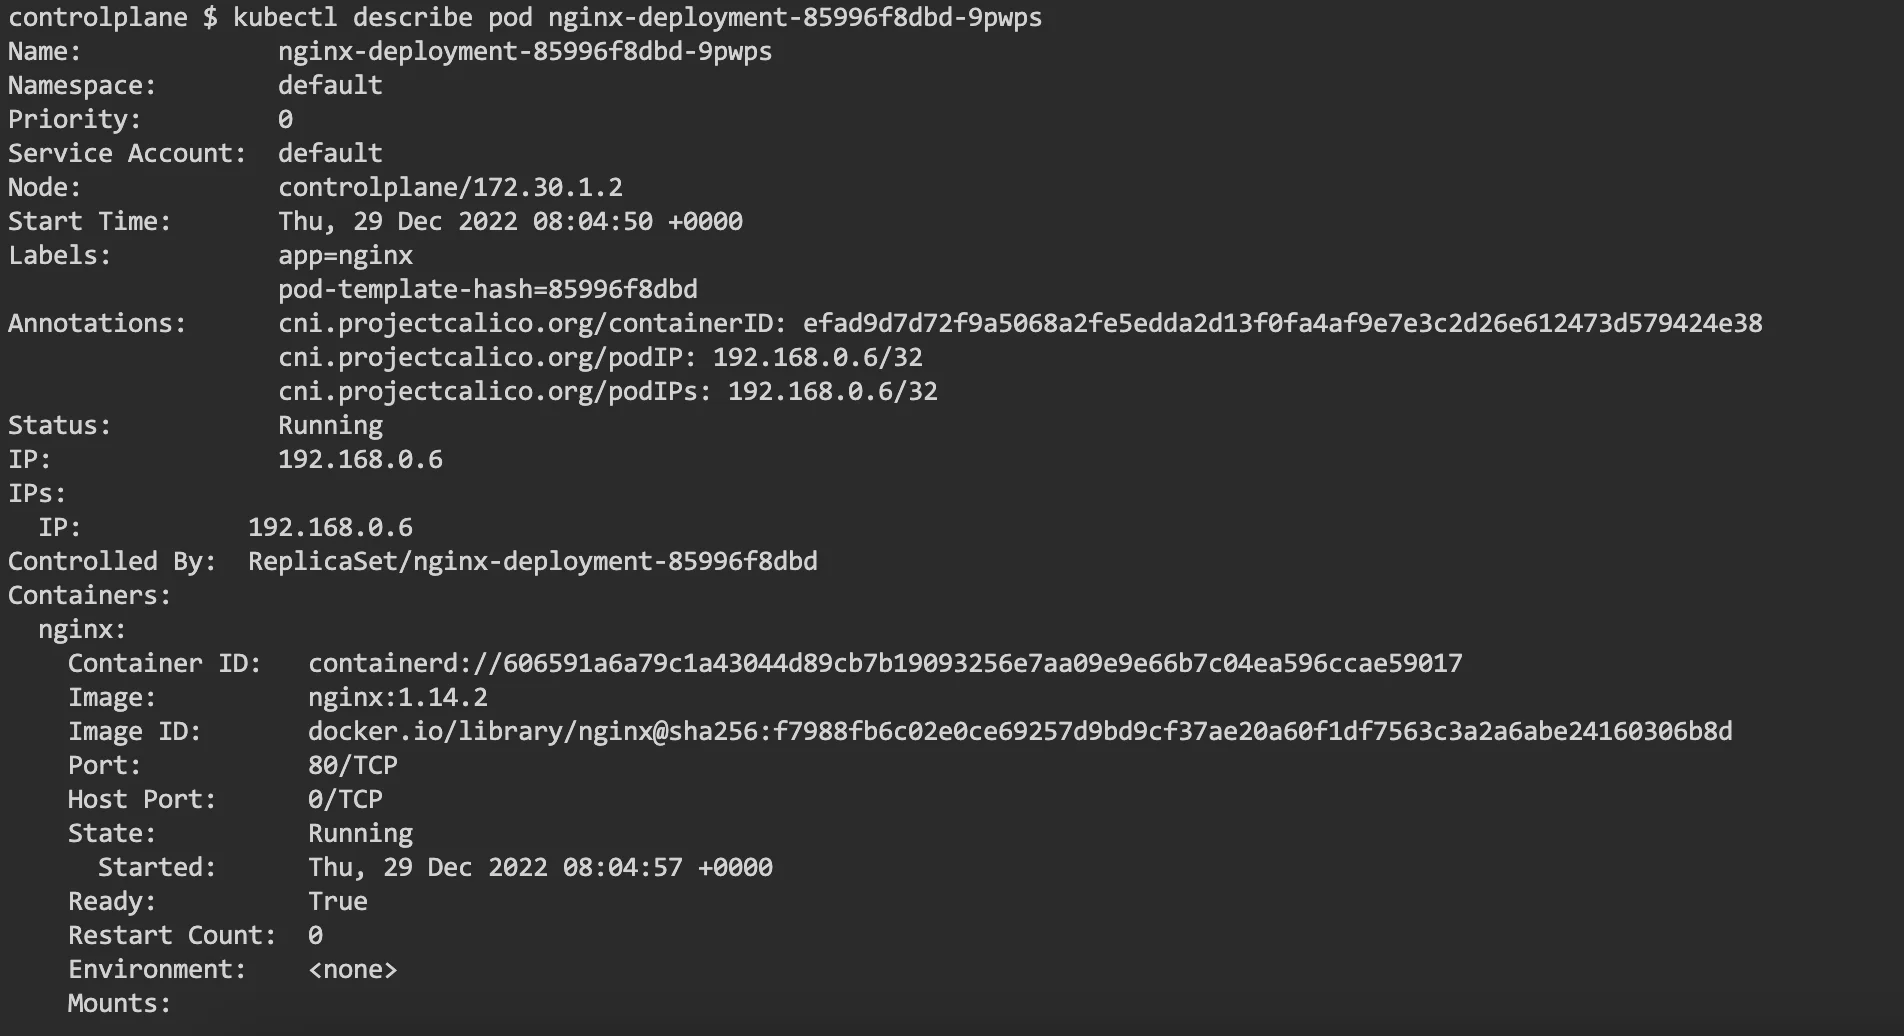
You can even get more information on each of the pods. Run the command:
$ kubectl describe pod <name-of-a-pod-from-lastcommand>
Note that this is a stateless application. This means that once the deployment is stopped, none of the states in the pods persist.
Updating a deployed application
To update the application, in this case, Nginx – we just need to edit the YAML file. In the below sample, we update the version of Nginx from 1.14.2 to 1.16.1.
To apply the update, run the kubectl apply command again.

This time you would see new pods being created and old pods terminated.

If we run the get pods command immediately after the update of the configuration, we can see the status of old pods as “Terminating”. This is the status of the pods when we applied the new configuration again.

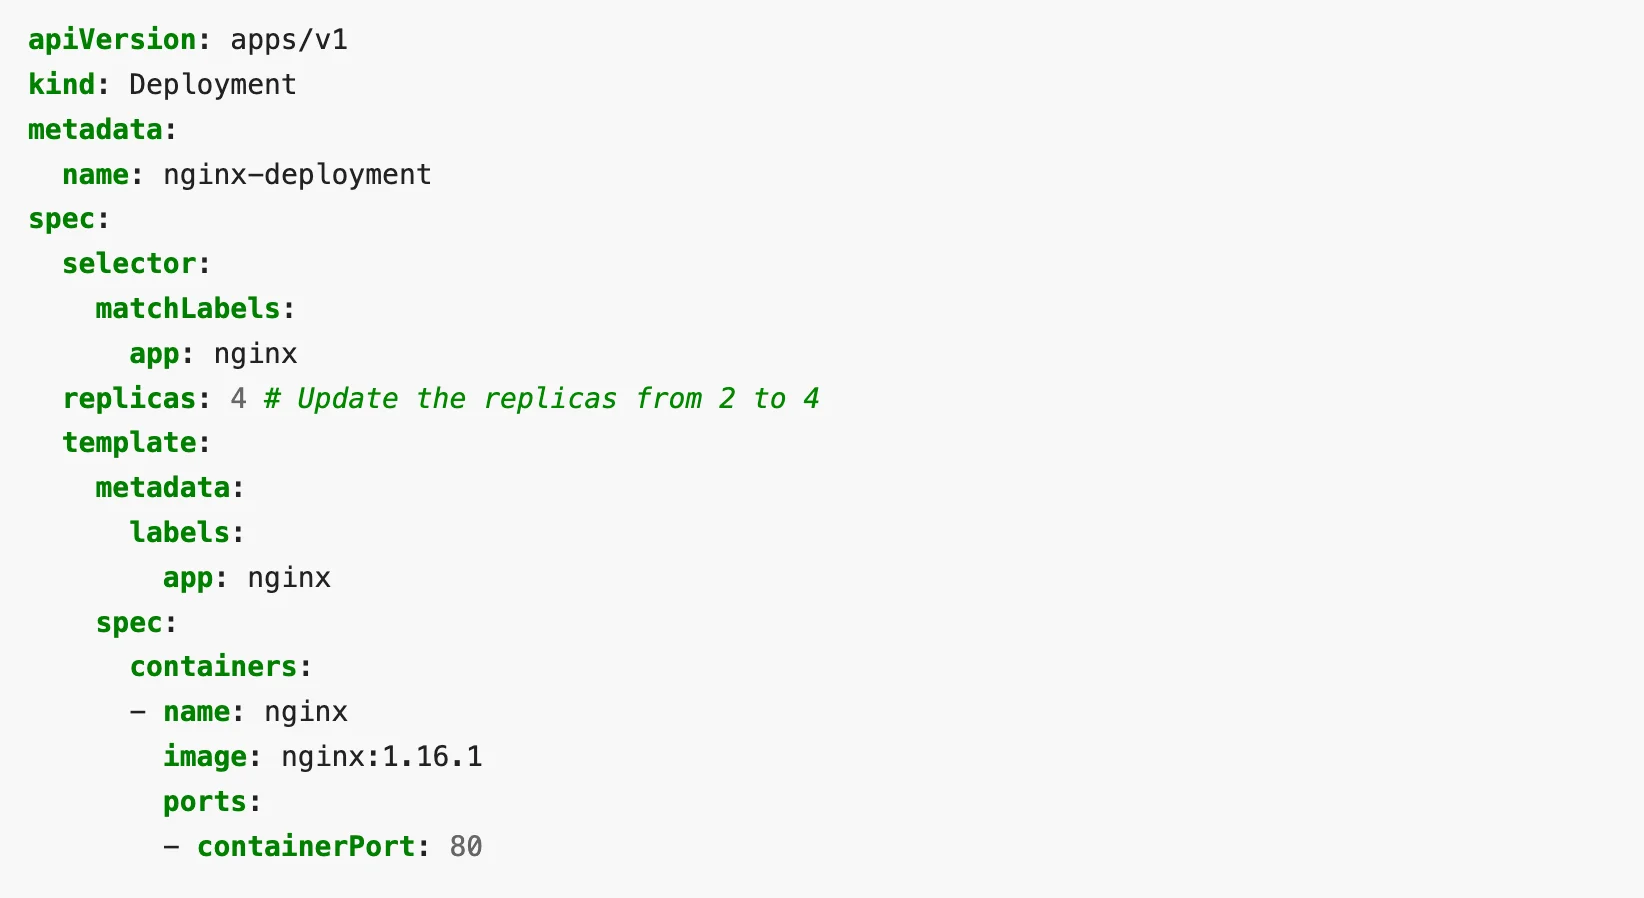
Scaling the application
To increase the number of pods working for a particular application, you can edit the configuration and increase the number of replica sets. Here is a sample of that:
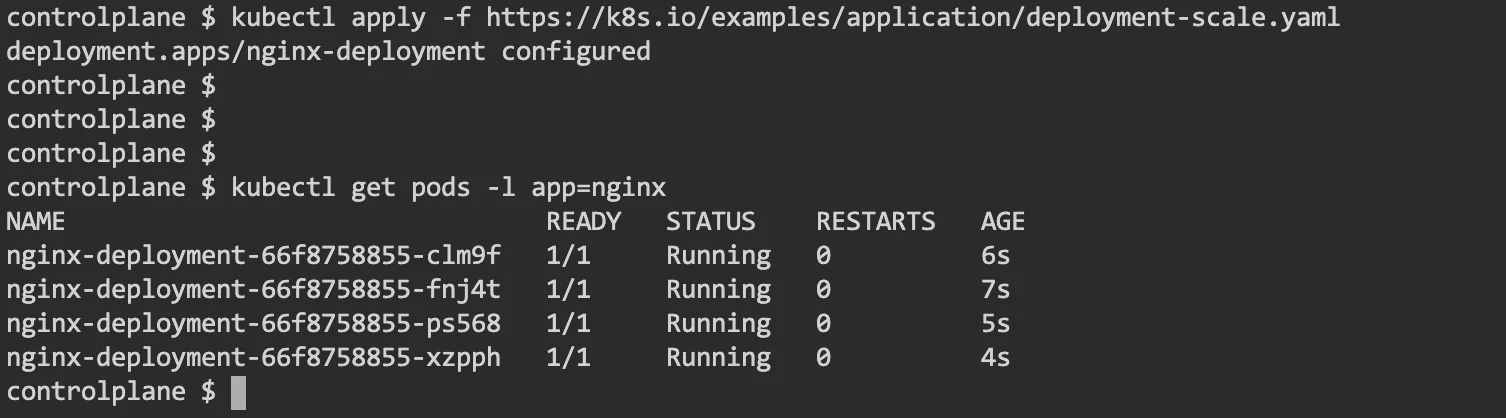
Applying the new configuration is similar to earlier examples: “kubectl apply”. You can then check the pods running with “get pods” and you should see the new count of pods as mentioned in the configuration file.
Delete the application
To delete the application, just run the “delete deployment” sub-command.

Running a Stateful application
Stateful applications have persistent storage. This helps maintain the state of pods and store data in storage across the lifecycle of pods.
Basic storage building blocks in Kubernetes are called volumes. A volume is attached to a pod and behaves like a local storage. But it has no persistence to it. This means when a pod is destroyed, the volume (i.e. the storage) also gets released.
But there are ways to make storage persistent. Many applications, like database applications, need this kind of persistent storage.
Persistence in Kubernetes
Kubernetes has a concept of PersistentVolume (PV) and PersistentVolumeClaim (PVC) to implement persistence in storage.
A PersistentVolume (PV) is a piece of storage in the cluster. It is a cluster resource like any node in a cluster. A PersistentVolumeClaim (PVC) is a request for storage by a user.
Just like a Pod consumes node resources, PVCs consume PV resources. Pods request compute resources like CPU and memory. PVCs request sizes of volume and access modes (like ReadWriteOnce, ReadOnlyMany or ReadWriteMany).
Let’s see an example of a pod using a PersistentVolume as storage.
Example: Pod using PersistentVolume
In this example, we will create an Nginx cluster similar to our previous example, but the Nginx will host an index.html that is stored on the node.
Thus, irrespective of the state of the pod, the file index.html will persist. The directory on the node will be mounted on a directory in the pod. Let’s see how that happens.
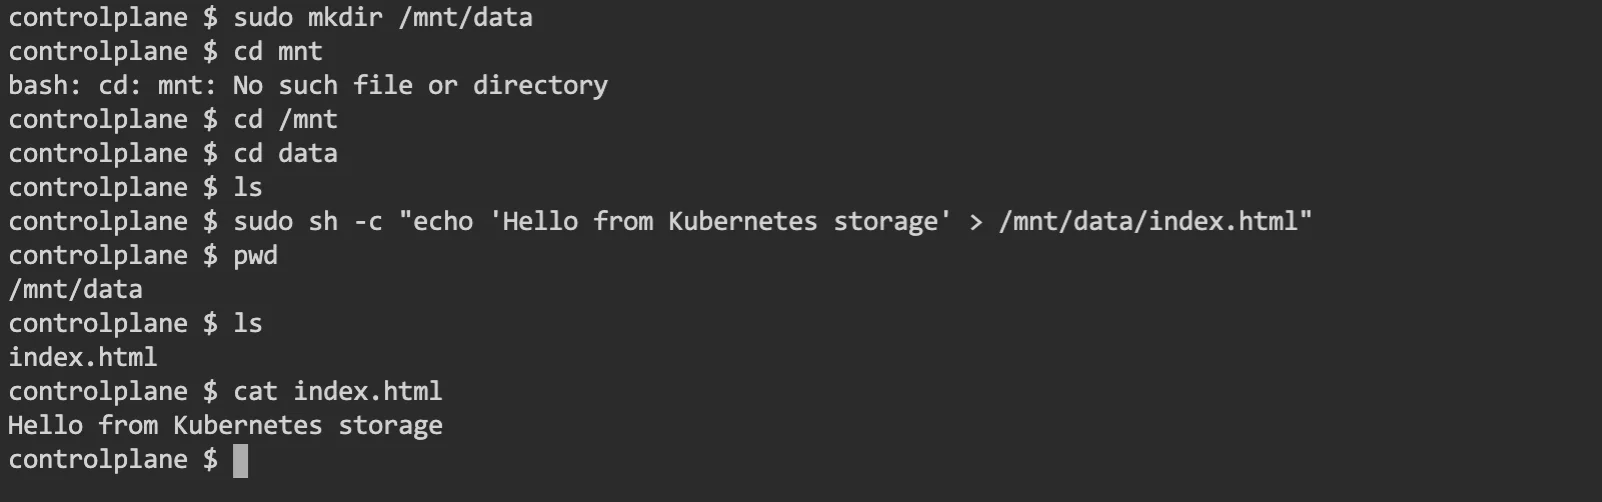
Step 1: Create an index.html
Login to your node and create a directory /mnt/data with a simple index.html file inside it.
Here is one way you would do it:
Step 2: Create a PersistentVolume
We will now use this /mnt/data as the hostPath PersistentVolume. The configuration file for the hostPath /mnt/data would look as follows:

The above config file basically describes a Persistent at /mnt/data on the node. It mentions that the size of it is 10 Gb and has an access mode of ReadWriteOnce. ReadWriteOnce means, the volume will have read-write access for a single node.
You can apply this sample with kubectl apply command, and that will create the PersistentVolume.

You can check the status of the PV with the below command. The name of the PV is what you gave to metadata.name in the config file.

Step 3: Create a PersistentVolumeClaim
Next, we need a PersistentVolumeClaim. Pods use PVCs to request physical storage from the PV. A sample config file to create a PersistentVolumeClaim will look as below:
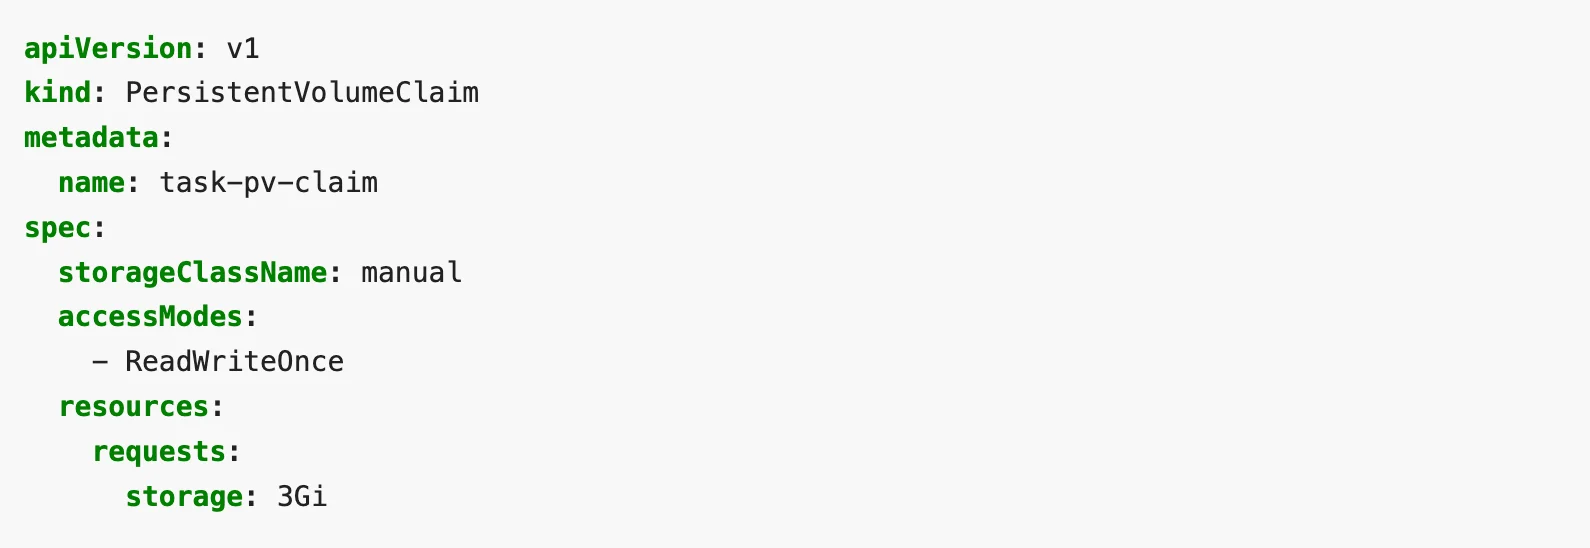
The above file is requesting a volume of size 3Gb with read-write access for at least one node.
To create the PVC, run the kubectl apply command on the config file. The output file will look like this:

You can check the PV and PVC status with a kubectl get command.

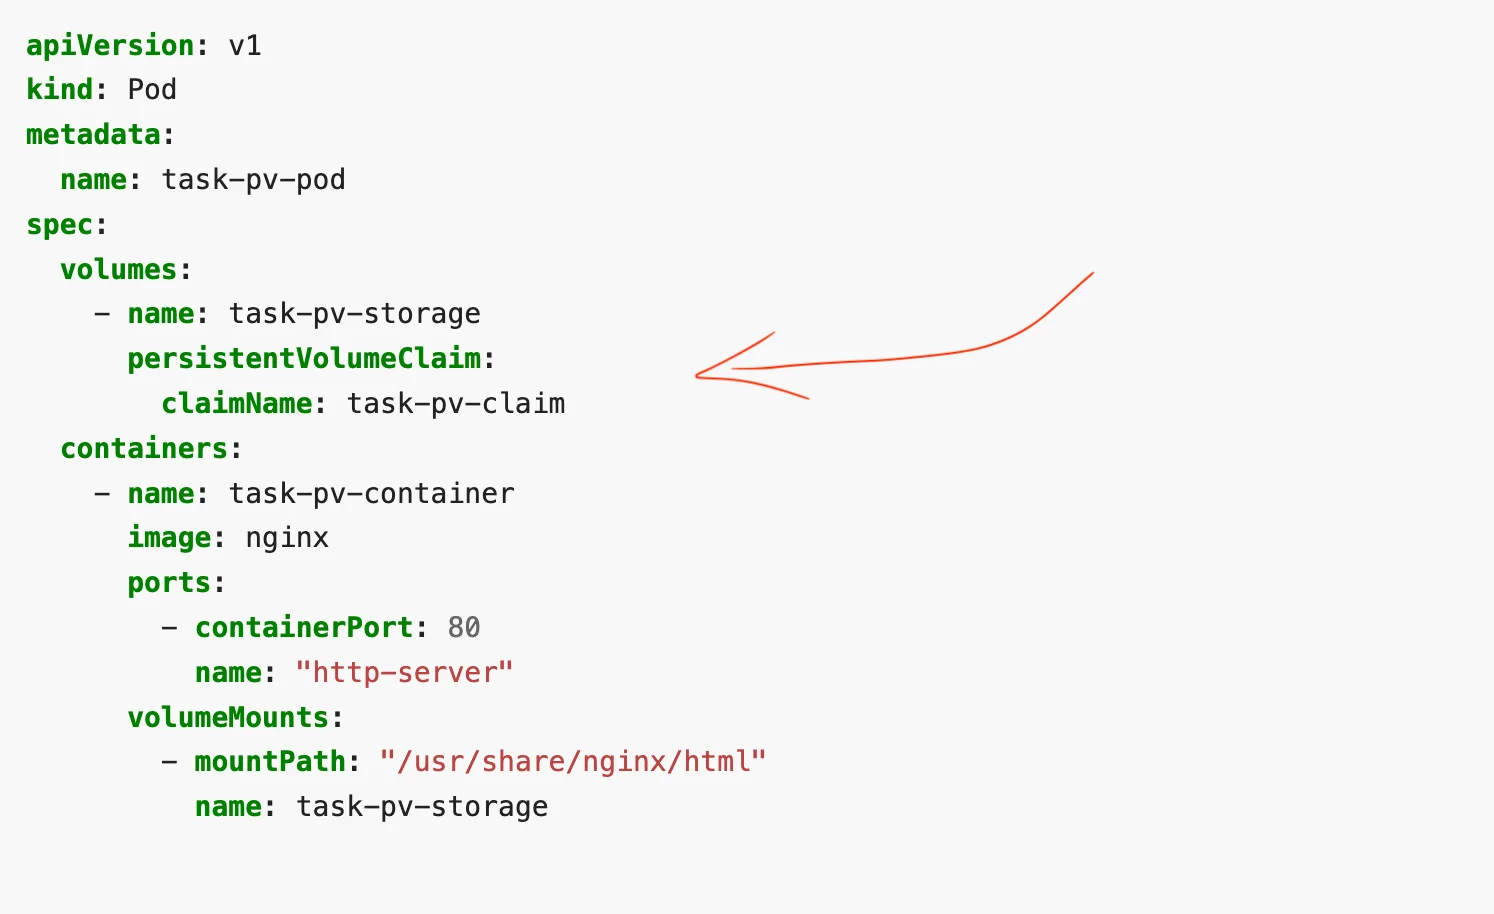
Step 4: Create a Pod with PersistentVolumeClaim
Now we are ready to create a pod with the PVC attached to it. Here is a sample config file for such a pod:
To create the pod, apply the configuration file using the kubectl apply command as follows:

You should see the pod as “running” when you check the status using “kubectl get” command.

Step 5: Run Nginx with a file from PersistentVolume
Everything is now set. Nginx in the container inside the pod should use the index.html from the /mnt/data/ in the node. The volume was mounted to /usr/share/nginx/html in the container.
To check this, let’s log in to the container and do a curl http://localhost.
We can run a kubectl exec command on the pod to log in to the shell. Once you login to the shell on the container, you can run the apt command to install curl.
Here’s a sample of how it would look:
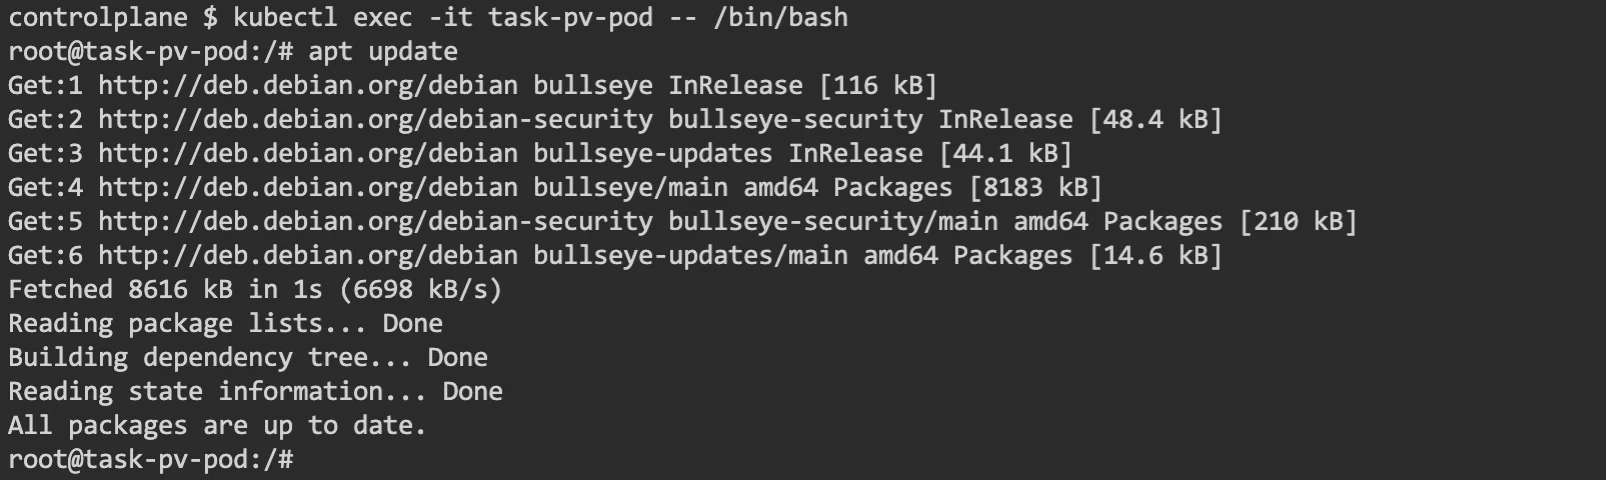
Running an apt install command to set up curl.

Once curl is installed successfully, the curl http://localhost command should show the contents of index.html that we created on /mnt/data on our node.
A successful output would look as follows:

Step 6: Delete the PV and PVC
If you wish to delete the volumes and pods created, you can do them in reverse order. Delete the pod first and then the PVC. Once both are deleted, you can go about deleting the PV.
Here is how the command outputs would look like for our example:

And that is how you run a Stateful application on Kubernetes.
Taikun – Run and manage applications on Kubernetes easily
We have seen how an application can be run on Kubernetes. But it is not always easy for teams to manage Kubernetes on the command line and then monitor it separately for each cluster. This is where Taikun can help.
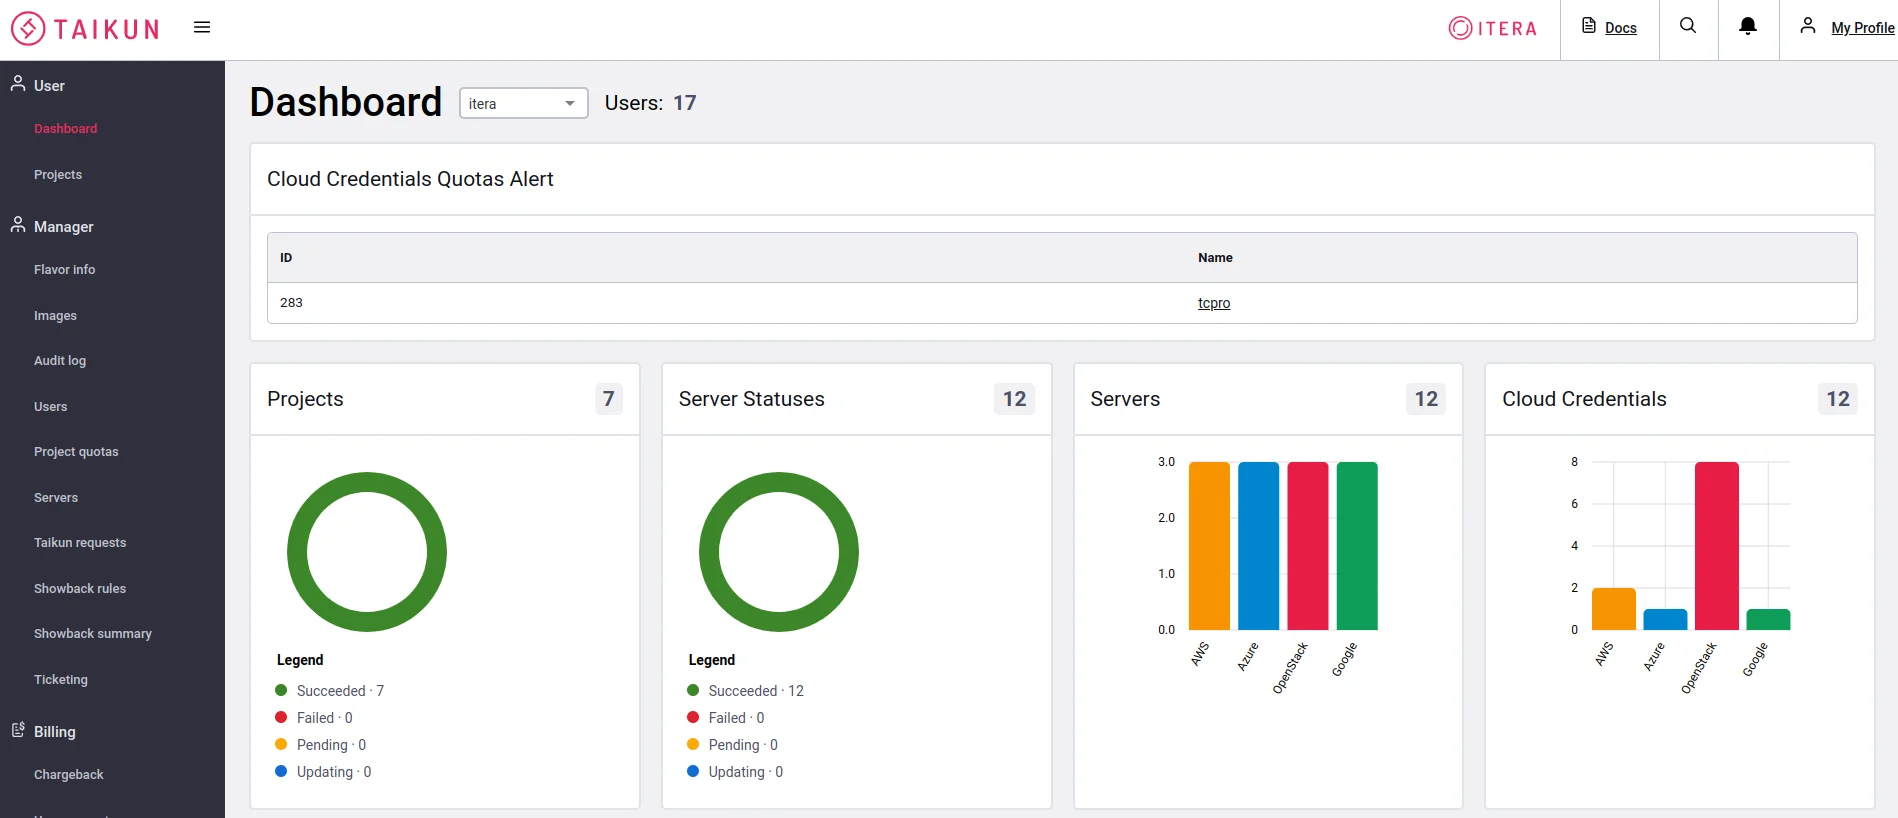
Taikun is a cloud-based application that can help you manage and monitor your Kubernetes infrastructure. Taikun works with all major cloud infrastructures and provides a simple seamless interface to deal with your Kubernetes setup.
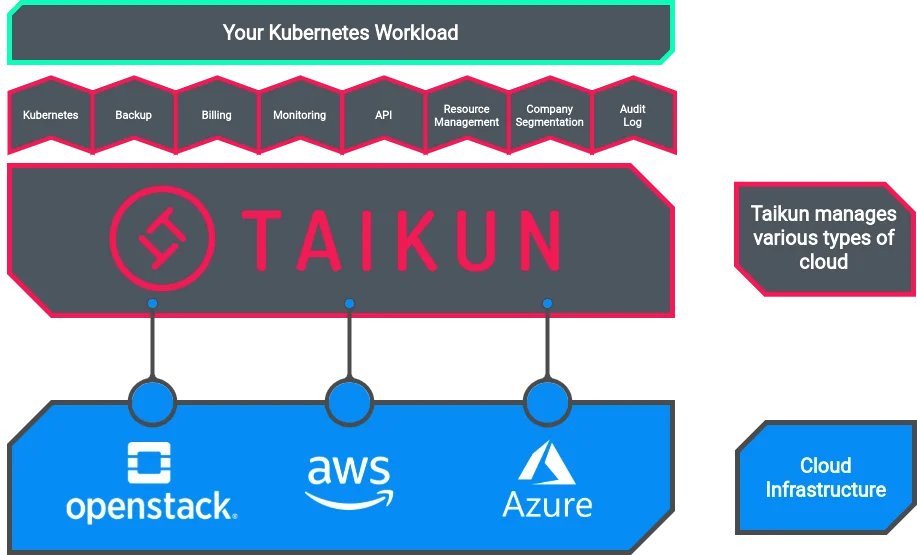
Taikun abstracts underlying complexities for the user
Taikun is developed by Itera.io, which is a silver member of CNCF. This means all the cloud deployments are CNCF-certified. This enables interoperability and consistency from one Kubernetes installation to the next and helps the team to stay largely cloud-agnostic.
CNCF-certified Kubernetes installations also ensure that the latest stable release of Kubernetes will be available for use in the clusters. Such a setup makes the entire setup very stable and predictable for all cloud use cases.
If you wish to try Taikun, you can try our cloud-based solution for free or contact us to explore a custom in-house solution.
